Menu

Menu

The WordPress Security Team is aware of multiple ongoing phishing scams impersonating both the “WordPress team” and the “WordPress Security Team“ in an attempt to convince administrators to install a plugin on their website which contains malware.

The WordPress Security Team will never email you requesting that you install a plugin or theme on your site, and will never ask for an administrator username and password.

If you receive an unsolicited email claiming to be from WordPress with instructions similar to those described above, please disregard the emails and indicate that the email is a scam to your email provider.

These emails link to a phishing site that appears to be the WordPress plugin repository on a domain that is not owned by WordPress or an associated entity. Both Patchstack and Wordfence have written articles that go in to further detail.

Official emails from the WordPress project will always:

  • Come from a @wordpress.org or @wordpress.net domain.
  • Should also say “Signed by: wordpress.org” in the email details section.
Screenshot of email sent by a WordPress.org email account. The details include "mailed-by wordpress.org" and "signed-by wordpress.org".

The WordPress Security Team will only communicate with WordPress users in the following locations:

The WordPress Plugin team will never communicate directly with a plugin’s users but may email plugin support staff, owners and contributors. These emails will be sent from [email protected] and be signed as indicated above.

The official WordPress plugin repository is located at wordpress.org/plugins with internationalized versions on subdomains, such as fr.wordpress.org/pluginsen-au.wordpress.org/plugins, etc. A subdomain may contain a hyphen, however a dot will always appear before wordpress.org.

A WordPress site’s administrators can also access the plugin repository via the plugins menu in the WordPress dashboard.

As WordPress is the most used CMS, these types of phishing scams will happen occasionally. Please be vigilant for unexpected emails asking you to install a theme, plugin or linking to a login form.

The Scamwatch website has some tips for identifying emails and text messages that are likely to be scams.

As always, if you believe that you have discovered a security vulnerability in WordPress, please follow the project’s Security policies by privately and responsibly disclosing the issue directly to the WordPress Security team through the project’s official HackerOne page.

Source from https://wordpress.org/news/2023/12/alert-wordpress-security-team-impersonation-scams/


So, you’ve chosen to build a WordPress based website – congratulations on making an awesome decision! WordPress isn’t only easy to use for blogging, it also offer tons of fantastic options for design. Most notably, thousands of awesome free and premium themes you can use to customize the look of your website, with just a few clicks of your mouse. Yay!

In this article, we’re going to show you how easy it can be to install a new WordPress theme you’ve purchased from ThemeForest. We’ll also be highlighting some of the most common errors folks run into when installing a theme for the first time. So, grab a theme and let’s get started!

First you need to choose your perfect domain name. Then, select a good web host. Bluehost offers affordable hosting options with 1- click WordPress installation that many people love. We personally prefer and use Managed WordPress hosting from WP Engine where WordPress is already installed and configured for you (plus they manage your server side settings for you).

Option 1: Install your theme through WordPress

If you’ve purchased your theme at Themeforest, you’ll need to download the theme file before you try and install it. Simply log into your account, go to your downloads and locate your theme. Click on the download button and select the “Installable WordPress file only”. This will download the zip file for your theme.

Common error: Downloading the wrong theme zip file

Make absolutely, positively sure you select the “Installable WordPress file only” option. If you select “All files & documentation” by mistake, you will not be able to install this zip as is. Instead unzip the file and then locate the installable theme file within it. Luckily most developers clearly label their files, so it should be pretty easy to find.

Common error: Zip file won’t download

It’s possible that you have your computer setup to automatically unzip files when you download them. You cannot install a regular folder in WordPress. If this is the case remember to right click and “Compress” your theme before moving onto the next step and installing it.

Log into your WordPress installation and before you do anything else make sure WordPress is up to date. Okay – this might not effect the installation of your WordPress theme but it’s a crucial security step. You always, always, always want to keep WordPress up to date.

Now that you’re sure you’re running the latest version of WordPress, navigate to Appearance > Themes and click the “Add New” button at the top of the window. Then click the “Upload Theme” button.

Click the “Browse…” button and select the zip file you previously downloaded. Click “Install Now” and then wait a minute while WordPress works its magic. Once the theme files have been completely uploaded just click the “Activate” button.

Common error: Stylesheet is missing

If after clicking “Install Now” you see an error that “The package could not be installed. The theme is missing the style.css stylesheet,” then you probably didn’t follow our instructions from step 1. You more than likely downloaded the “All files & Documentation” instead of the the installable theme. Go back and double check that you’ve downloaded the correct file.

Common error: Are you sure you want to do this?

After browsing for your theme and clicking the “Install Now” button, it’s possible your WordPress installation will ask “Are you sure you want to do this?” This could be due to the fact that you are trying to install the wrong zip file (remember – you want the “Installable WordPress file only”) or it’s possible the upload limit on your server isn’t large enough.

If it’s the latter, you’ll need to contact your hosting company to have them increase it, or do it yourself by accessing your PHP.INI file via FTP and increasing the upload_max_filesize value.

Common error: White screen

If you attempt to install your theme, and end up on a white screen of death (you know, the WordPress version of the Windows blue screen of death) you probably need to make a tweak to your server. The most common cause of this error is that your server’s memory limit to PHP is too low. To solve this either:

For a more detailed explanation you can see our own Total theme troubleshooting doc that walks you through the steps. But, if you go with a managed WordPress host you shouldn’t ever run into this problem.

Option 2: Install your theme via FTP/SFTP

If you’d prefer to install your theme via FTP/SFTP you can. It’s still super easy, there are just couple important steps you don’t want to miss.

First, you need to install a FTP (file transfer protocol) solution – we like Transmitor FileZilla (this second one is free – woot!). Once you’ve got it installed, open up your app to connect to your server. You will also need to be logged into your hosting account to gather the following information:

  • Name: Give your server a nickname that you’ll remember (especially if you plan on connecting to multiple sites)
  • Where: Choose a location for your server (favorites just happens to be my default FTP/SFTP folder).
  • Protocol: This will depend on which options your host provides for you to connect to your server. Go to your hosting account and locate your FTP/SFTP settings. This will vary based on your host (WP Engine’s can be found on your installs overview page, GoDaddy’s is in the SSH & SFTP tab for site Settings) so you may have to poke around a bit. Select the option that your host offers.
  • Server: Enter your domain name (the server url address) here.
  • Username & Password: This will either be provide by your host in the FTP/SFTP settings or you’ll have the option to create your own new ones. Copy and paste them over.
  • Port: Be sure you’re set to use the same port as specified by your host – you may not need to change this.

Once you’ve added all your info save your server, then click to open it and browse to your wp-content/themesfolder.

Next you’ll need to download your WordPress theme which we covered in detail up above in the “installing your WordPress theme via WordPress” section. Please make sure you’re downloading the “Installable WordPress file only.”

With FTP/SFTP you’ll need to unzip the that file you just downloaded from Themeforest (it should look like an open folder icon). Then upload the extracted theme file.

Now log into your WordPress installation and navigate to Appearance > Themes and click to activate your theme. See – not too hard, right?

Common error: Wrong theme file/folder

When installing via FTP, it’s very important to be sure you upload only the theme file onto your server. A zipped file won’t work this time! Check that you’ve remembered to unzip your download. And, also double check that you’re uploading the correct theme only folder. You may have accidentally downloaded the theme plus docs and anything else.

Option 3: Install (and update) your theme with the Envato Market Plugin

After installing and activating your theme is super easy if you simply install the Envato Market plugin. The best part is that with this free plugin you’ll have access to all of your Themeforest and Codecanyon purchases right from your WordPress dashboard! This makes it even easier to install new purchases as well as keep them up to date so you always have the latest feature additions, bundled plugin updates and any theme security patches.

To get started first, download the plugin zip file from github, then log into your WordPress installation and navigate to Plugins > Add New.

Click on the “Upload Plugin” button at the top left of the screen, browse for the envato-market zip file and then click “Install Now.” When prompted click the “Activate Plugin” link.

Once the plugin is installed and active, you’ll need to sync it with your Envato account to have access to all of your WordPress theme and plugin purchases right from your dashboard. To do this, click on the “Generate A Personal Token” link on the Envato Market plugin page with your WordPress dashboard. This will take you to the EnvatoAPI page where you can generate an authorization token.

To generate your token simply log into your Envato account (unless you’re logged in already), check the box that you have read and agreed to the terms (but don’t uncheck any of the select options – the Envato Market plugin needs access to this info to work properly) and click the green button for “Create Token.” You should see a green success screen next. Copy your token code and go back to your WordPress dashboard.

Paste the code into the Token field on the Envato Market plugin page then Save Changes. If you see an error that says “You do not have sufficient permissions to delete transients” don’t worry – just click your browser’s back button and try adding your token again.

Once your token is saved you should see all of your purchases. Just click the blue button to install your theme, and that’s it. The Envato Market plugin will also show if there is an update available with a banner notice over the item. All you have to do is click to update – it’s that easy!

Common error: Token won’t validate

If your token will not validate it could be one of two problems. You could be entering the wrong code. For the Envato Market plugin to work you MUST generate a token for the EnvatoAPI. Your purchase invoice number, theme license or any other code from your Themeforest dashboard will not work.

The second possibility is that you’ve un-checked some of the required API permissions when generating your code. If this is the case go back and generate a new code without removing any of the pre-checked permissions.

It’s time to start blogging!

That’s it! We’ve covered three very different but also very easy ways to install your Themeforest WordPress theme, so now you should have your theme installed and ready to go. Of course, you may want to take the time to customize your theme using any Customizer options built-in, page builder plugins that have been included, or even custom CSS, but that’s a whole other blog post.

If you have any questions or if you run into any new errors just leave a comment below. We’ll do our best to help, and if we don’t have an answer certainly another community member will.

Happy blogging!

If you are building a photography website for yourself or a client, Kazron is a WordPress theme worth using. It is remarkably flexible, resourceful, convenient, engaging and responsive – creating an avenue for photographers to showcase their gallery and market their brand.

This WordPress theme is a useful and promising platform that can help provide hobbyists, professional photographers, photojournalists and photo studios modern and sophisticated websites. Users can fully customize their sites to accommodate their working or branding terms without any specific coding experience or knowledge. This theme uses the Codestar Framework with intuitive visual interfaces for layout design and streamlined customization.

The Kazron photography theme also uses the Booked Appointments plugin which allows you to connect with customers, get more photo shoots, grow your business. Your website visitors can book online schedules and appointment, too.

The Kazron WordPress theme is fully-responsive, allowing an incredible and optimize look on all mobile devices, whether it’s an Android smartphone or using Retina displays. Users have the option to customize the homepage with more than 20 available layouts, and the light and dark version to help align a website to the photographer’s brand. Setting up is just a click away. The one-import demo allows you to easily create a website by uploading a demo content, then customizing it to your liking. The theme also supports 10 different album layout so you can organize and showcase your photography differently.

An online photography store interface so you can make money out of your individual photos and gallery. The Kazron WordPress theme also supports various blog layouts, so you can create a story behind your brand and your photography. This can also help with your SEO and marketing. Ajax search is supported all throughout the site, so you can trust that you provide your website visitors the user experience they deserve.

THEME FEATURES

  • Responsive – This theme is responsive to give a perfect user experience on all devices.
  • Codestar Framework – A Lightweight and easy-to-use WordPress Options Framework. Save your time!
  • Booked plugin – Intuitive appointment scheduling through your browser, desktop/laptop, or smartphone. Connect with customers, get more photo shoots, grow your business.
  • Kazron Child Theme – Customize or tweak an existing WordPress theme without losing the ability to upgrade Kloud theme.
  • Boxed or full width layout – This can be set globally or even per page!
  • Built on Twitter Bootstrap – Kazron uses Twitter Bootstrap. This means that a range of shortcodes are automatically supported. For ease of use you can use the Visual Composer, Easy Bootstrap Shortcode or any other plugins to easily add visuals to your website.
  • Built with Less .css
  • Shortcode Support.
  • Footer – Easily adjust the footer column count from 1 to 4 columns.
  • Font Adjusting – Easily adjust the fonts within the theme with our robust theme customizer.
  • Header stick – Sticky Header is a godsend for those people who are tired of scrolling up from the bottom of the webpage to select an other menu item. Kazron’s main menu with logo will be following when you scroll and always be at the top of the screen. Now the viewers of your site will be thankful for the fast and easy navigation. And of course, this sticky header feature can be easily enabled/disabled in options panel of your theme.
  • Unlimited Color Options.
  • Moveable & Unlimited Sidebars – Move the sidebar to the left, the right, or hide it entirely for a full width page or post! (global or page/post specific).
  • Designed with HTML5 and CSS3.
  • Customizable Design & Code.
  • 800+ Google Fonts.
  • All installed Extensions are included.
  • Cross Browser Support.
  • Detailed Documentation Included.
  • Full Support.
  • + many more features.
  • More features coming soon.

CONNECT TO SUPPORT

  • Availability of the author to answer questions.
  • Answering technical questions about item’s features.
  • Assistance with reported bugs and issues.
  • Help with included 3rd party assets.

If you have any questions about customization of this template, which are not covered in the documentation feel free to ask a question in Forum . We really care about customer support services and guarantee to response to all support topics within 24 hours on weekday (a bit longer over weekend).

Please, feel free to post technical pre-sale questions directly to our Facebook message.

Save time and headaches. An installation service will setup your theme for free. Please, open a ticket to support forum. We will be glad to assist you.

best premium woocommerce themes 2018

CHANGE LOG

V1.0.0 – Aug, 10 2018

VIEW MORE POPULAR WORDPRESS THEMES

Purchase now and get free installation! For each purchase, customer will get free install service worth $50. Just open a topic with your purchase code & provide us WordPress admin information.

Aqua - Spa and Beauty Responsive WooCommerce WordPress Theme Paradise - Multipurpose Spa & Beauty WordPress Theme Pain - Charity & Fundraise Non-profit WordPress Theme Preschool - Nurseries Kindergarten and School WordPress Theme Perfomy - Perfume & Jewelry WooCommerce WordPress Theme AutoPro - Car Dealer WordPress Theme Ethan - Responsive WooCommerce WordPress Theme Financial - Business and Financial WordPress Theme

Best Responsive WordPress Theme 2017

Kazron is a wonderfully malleable and incredibly resourceful, convenient and easy to use, engaging and responsive WordPress photography website theme.

This theme is a purposeful platform aimed to provide amateur and professional photographers, photojournalists and photography studios an easy avenue towards development of sophisticated, modern photography websites, fully customizable to suit their functional or branding specifications, and requiring absolutely no coding experience or knowledge, due to deployment of intuitive visual interfaces for layout design and element customization.

Using the Booked Appointments plugin you can connect with customers, get more photo shoots, grow your business. (and your users will be able to book scheduling online, as well). We made the theme fully responsive so it looks incredible on all mobile devices, from Android smartphone to Retina displays. Go ahead and check this flexible WordPress theme with infinite customization capabilities!

THEME FEATURES

  • Responsive – This theme is responsive to give a perfect user experience on all devices.
  • Codestar Framework – A Lightweight and easy-to-use WordPress Options Framework. Save your time!
  • Booked plugin – Intuitive appointment scheduling through your browser, desktop/laptop, or smartphone. Connect with customers, get more photo shoots, grow your business.
  • Kazron Child Theme – Customize or tweak an existing WordPress theme without losing the ability to upgrade Kloud theme.
  • Boxed or full width layout – This can be set globally or even per page!
  • Built on Twitter Bootstrap – Kazron uses Twitter Bootstrap. This means that a range of shortcodes are automatically supported. For ease of use you can use the Visual Composer, Easy Bootstrap Shortcode or any other plugins to easily add visuals to your website.
  • Built with Less .css
  • Shortcode Support.
  • Footer – Easily adjust the footer column count from 1 to 4 columns.
  • Font Adjusting – Easily adjust the fonts within the theme with our robust theme customizer.
  • Header stick – Sticky Header is a godsend for those people who are tired of scrolling up from the bottom of the webpage to select an other menu item. Kazron’s main menu with logo will be following when you scroll and always be at the top of the screen. Now the viewers of your site will be thankful for the fast and easy navigation. And of course, this sticky header feature can be easily enabled/disabled in options panel of your theme.
  • Unlimited Color Options.
  • Moveable & Unlimited Sidebars – Move the sidebar to the left, the right, or hide it entirely for a full width page or post! (global or page/post specific).
  • Designed with HTML5 and CSS3.
  • Customizable Design & Code.
  • 800+ Google Fonts.
  • All installed Extensions are included.
  • Cross Browser Support.
  • Detailed Documentation Included.
  • Full Support.
  • + many more features.
  • More features coming soon.

CONNECT TO SUPPORT

  • Availability of the author to answer questions.
  • Answering technical questions about item’s features.
  • Assistance with reported bugs and issues.
  • Help with included 3rd party assets.

If you have any questions about customization of this template, which are not covered in the documentation feel free to ask a question in Forum . We really care about customer support services and guarantee to response to all support topics within 24 hours on weekday (a bit longer over weekend).

Please, feel free to post technical pre-sale questions directly to our Facebook message.

Save time and headaches. An installation service will setup your theme for free. Please, open a ticket to support forum. We will be glad to assist you.

best premium woocommerce themes 2018

CHANGE LOG

V1.0.0 – Aug, 10 2018

VIEW MORE POPULAR WORDPRESS THEMES

Purchase now and get free installation! For each purchase, customer will get free install service worth $50. Just open a topic with your purchase code & provide us WordPress admin information.

Aqua - Spa and Beauty Responsive WooCommerce WordPress Theme Paradise - Multipurpose Spa & Beauty WordPress Theme Pain - Charity & Fundraise Non-profit WordPress Theme Preschool - Nurseries Kindergarten and School WordPress Theme Perfomy - Perfume & Jewelry WooCommerce WordPress Theme AutoPro - Car Dealer WordPress Theme Ethan - Responsive WooCommerce WordPress Theme Financial - Business and Financial WordPress Theme

Best Responsive WordPress Theme 2017

Setting up API keys

If your client application does not use OAuth 2.0, then it must include an API key when it calls an API that’s enabled within a Google Cloud Platform project. The application passes this key into all API requests as a key=API_key parameter.To create your application’s API key:

  1. Go to the API Console.
  2. From the projects list, select a project or create a new one.
  3. If the APIs & services page isn’t already open, open the left side menu and select APIs & services.
  4. On the left, choose Credentials.
  5. Click Create credentials and then select API key.

Note: In addition to reading the instructions on this page, be sure to read Best practices for securely using API keys.

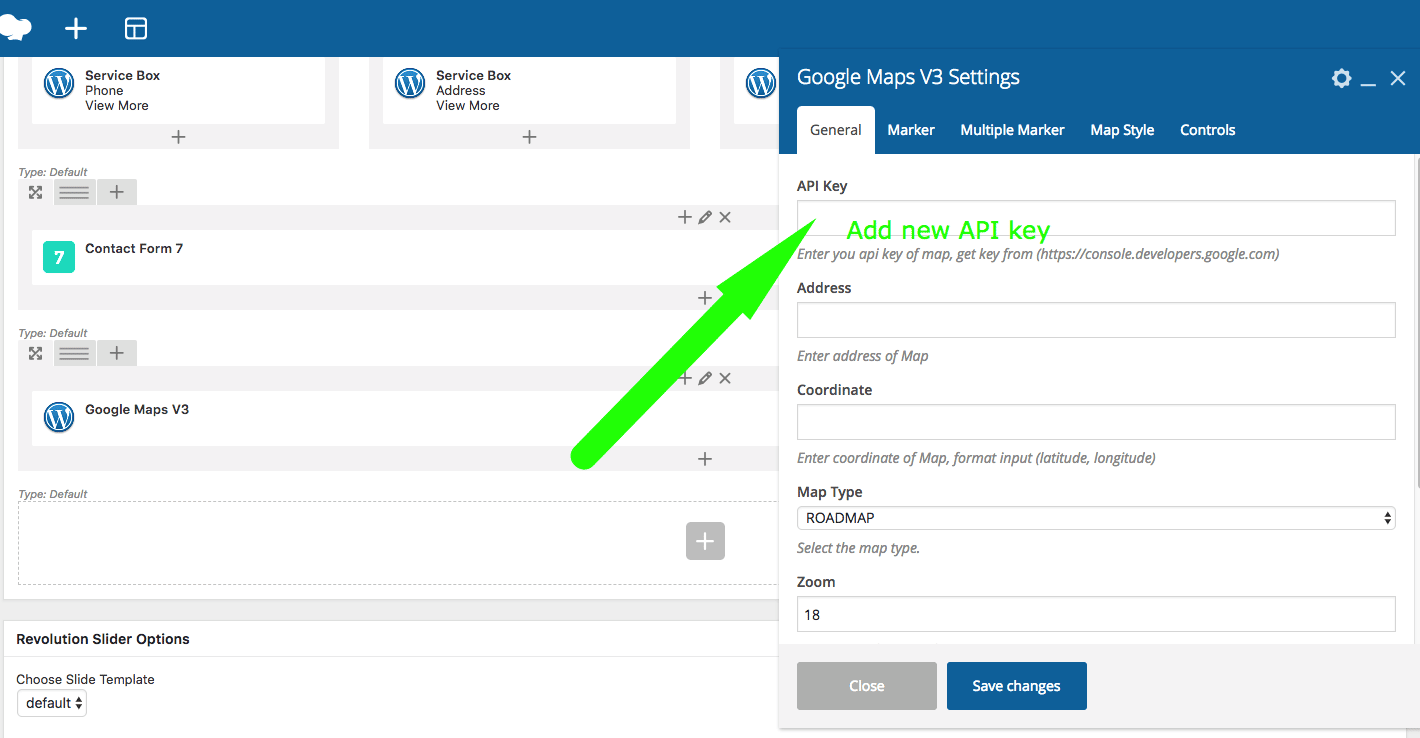
How to change API key in theme:

Solution 01: Add API key into the shortcode theme.


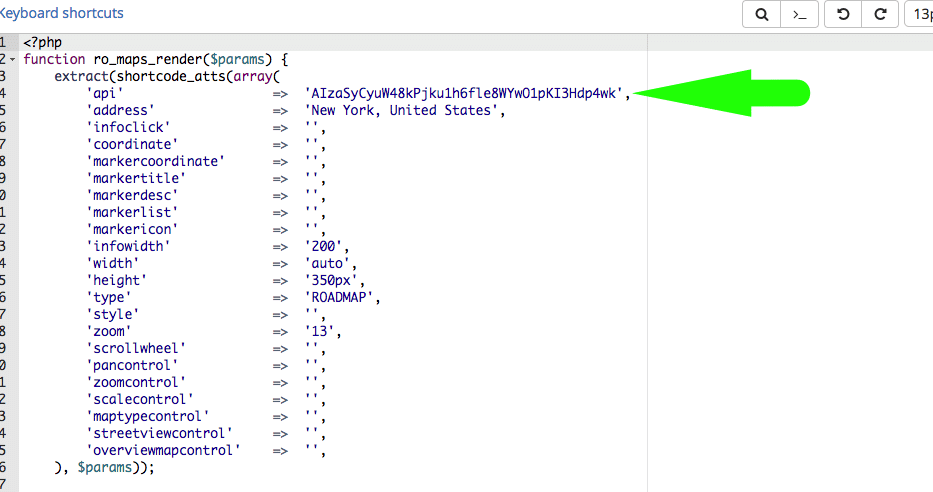
Solution 02: Add API key into default code theme.

wp-content/themes/theme_name/framework/shortcodes/map_v3/map_v3.php change this line ‘api’ => ‘AIzaSyCyuW48kPjku1h6fle8WYwO1pKI3Hdp4wk’,  to your API key.

Current API key:  AIzaSyCyuW48kPjku1h6fle8WYwO1pKI3Hdp4wk

Add Your API Key to Elementor

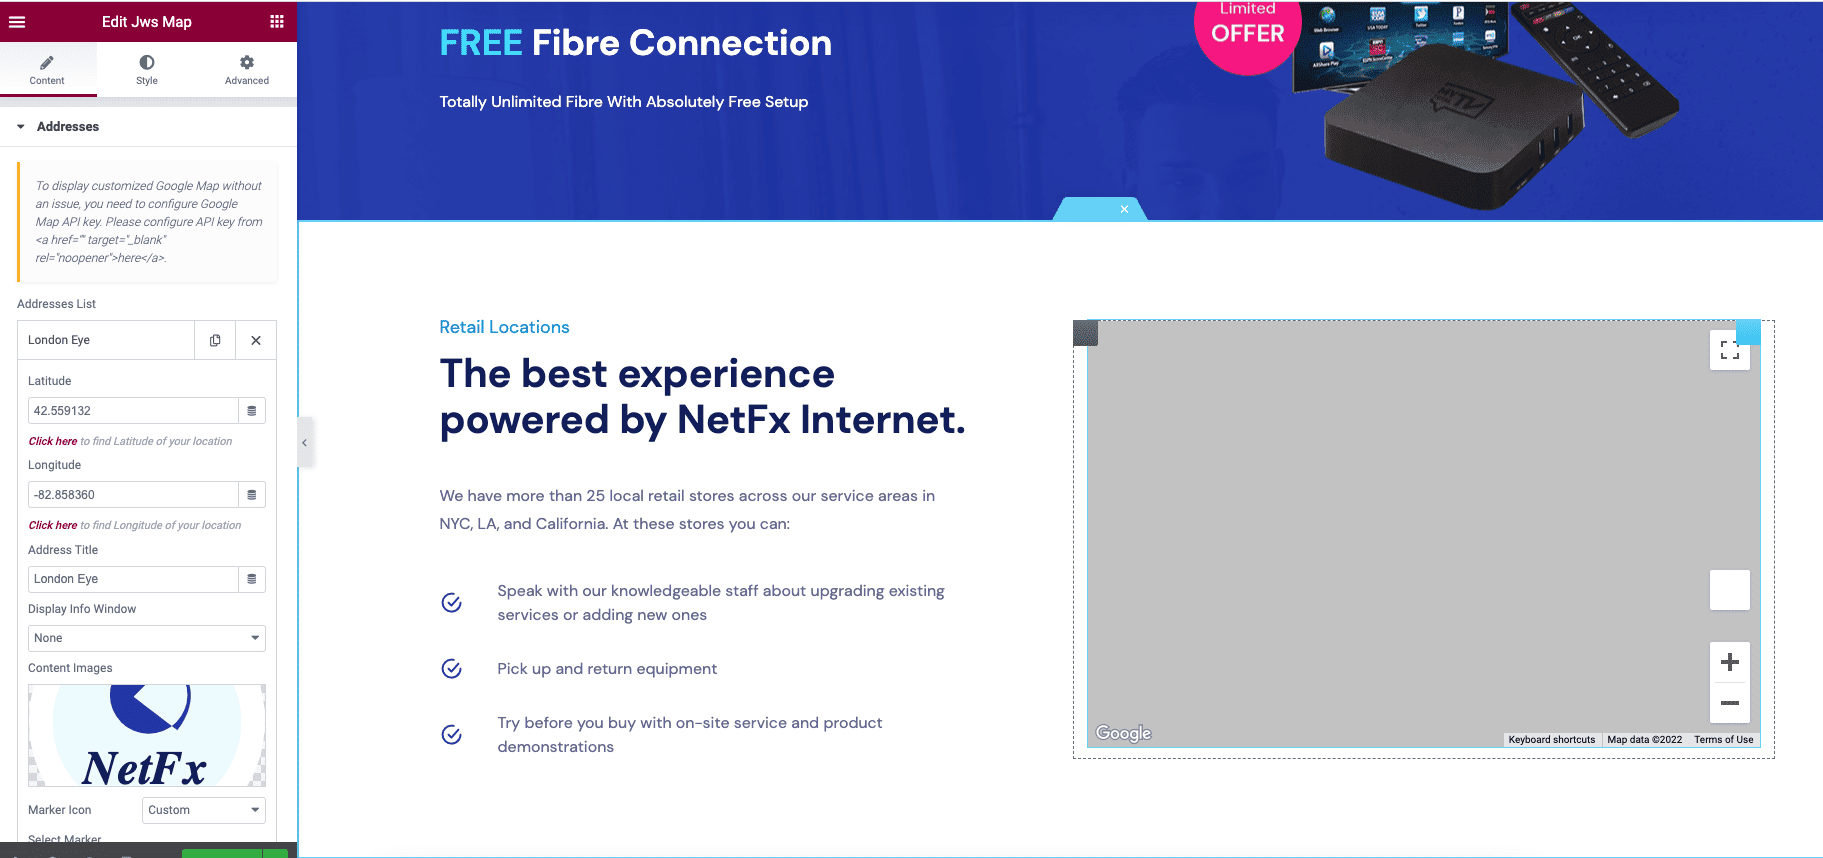
You may now navigate to Elementor > Settings > Integrations and place the key in order to use the Maps Widget.

Edit with Elementor > add Latitude and Longitude (you can find here: https://www.latlong.net)