After you’ve migrated your website, most likely you changed the URL of your website as well, these are the steps you need to take:

- Go to Elementor > Tools > Replace URL Tab
- Enter your old-url and your new-url and click Replace URL
- Under the General Tab > Regenerate CSS, click Regenerate Files
- In Settings > General on your WordPress Dashboard, make sure that the URLs are similar.

Better Search Replace: A New Plugin for Updating URLs and Text in WordPress Databases
When migrating a WordPress site to a new domain, you’ll have to update every instance of the site’s URL in the database. Some developers prefer to use tools like WP-CLI or WP Migrate DB to handle this, while others opt for a general database search and replace plugin with a UI in the WordPress admin.
Search and Replace is an old plugin, with nearly a million downloads, that can be used to update URLs and text in the database. I used this plugin successfully for a number of years, but it went without any updates for long time. It has since come under new ownership, although the screenshots demonstrate just how long ago the plugin was released.
Better Search Replace is a new take on database search and replace plugins. It was heavily based on Interconnect/It’s open source Search Replace DB script that performs replacement actions without damaging PHP serialized strings or objects. I’ve used this script a number of times with success, although it’s not as convenient as a plugin. The Better Search Replace plugin packages it up using native WordPress database functions and adds a friendly UI.
The plugin merges the best features from older plugins and the Interconnect/It script to support the following capabilities:
- Serialization support for all tables
- The ability to select specific tables
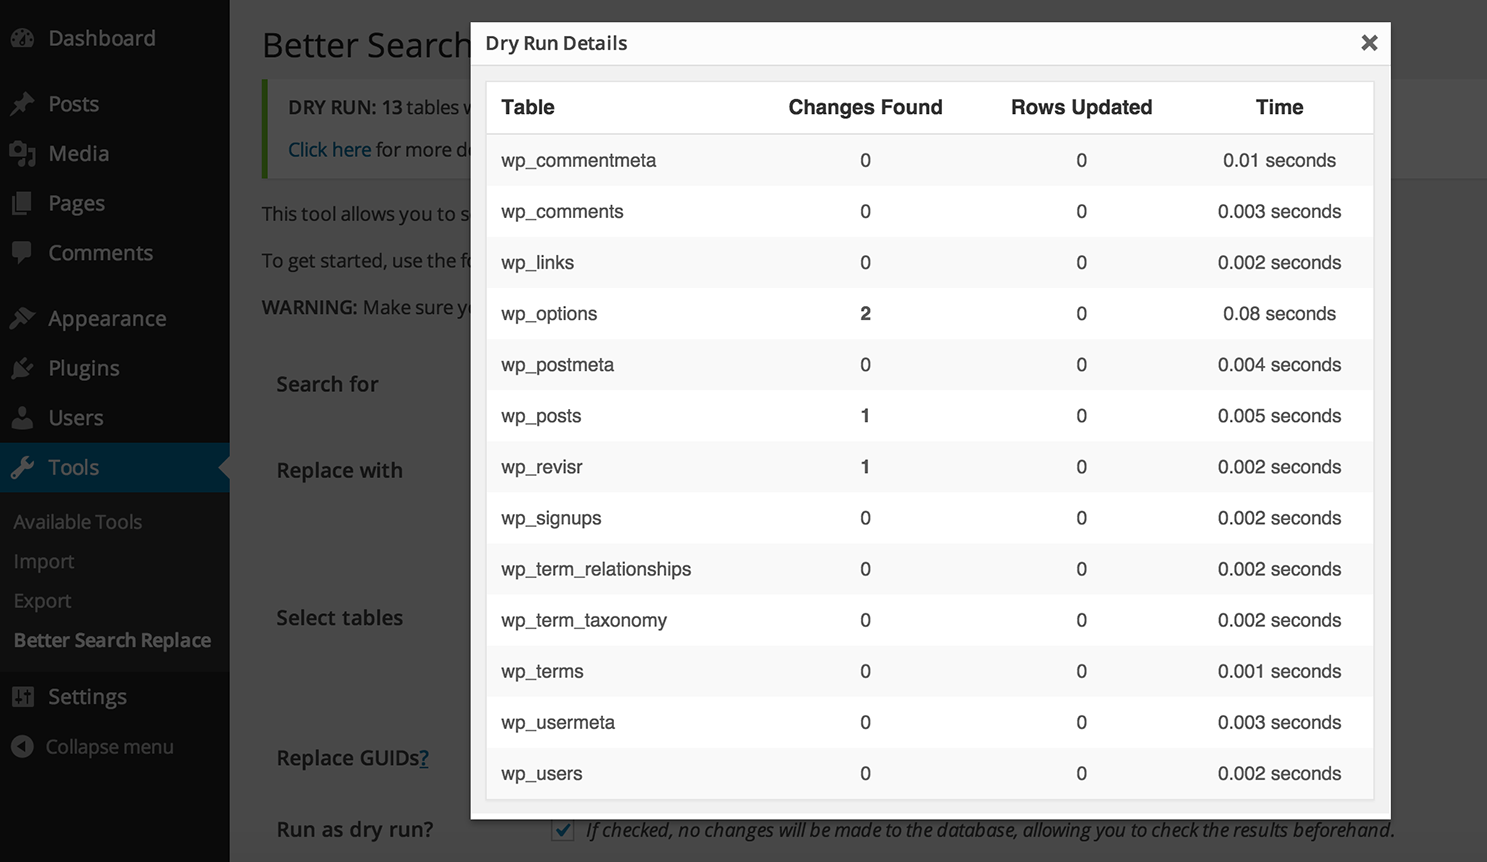
- The ability to run a “dry run” to see how many fields will be updated
- No server requirements aside from a running installation of WordPress
Since searching and replacing in the database is a sensitive action to perform, the “dry run” feature gives you a good idea of what you can expect before pulling the trigger. Even with the option of performing a dry run, you will undoubtedly want to have a backup of your database created before touching it.
Migrations aren’t the only reason for this type of plugin. Perhaps you’ve renamed your company or product line and need to replace all instances throughout your website. This plugin makes it safe and easy to perform the replacements directly within the WordPress admin. I tested it on a development site and found that it is fast and works exactly as advertised.
Better Search Replace was created by Matt Shaw, author of the Revisr plugin that allows developers to synchronize WordPress with a remote Git repository. If you’re a long-time fan of the Interconnect/It script, you’ll find that this plugin is even easier to use. You can find Better Search Replace on WordPress.org.
Using the Velvet Blues Update URLs WordPress Plugin
While updating the Site URL makes it possible for your site to be moved, it doesn’t update internal links or paths to images. The good news is, it is a fairly easy process to update these links.
-
- Begin by logging into your WordPress dashboard.
-
- Do a search for and install this plugin: Velvet Blues Update URLs
-
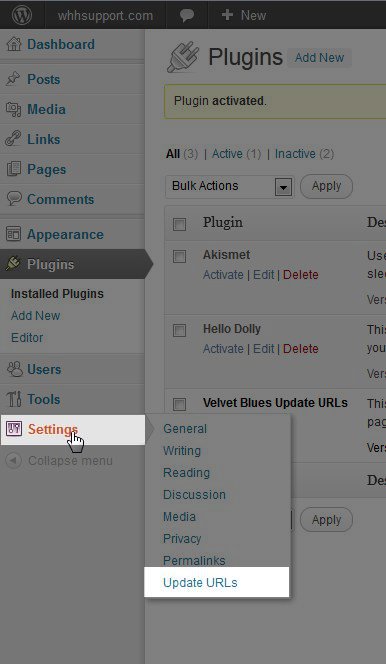
- Activate the plugin and open the Update URLs settings screen.
-
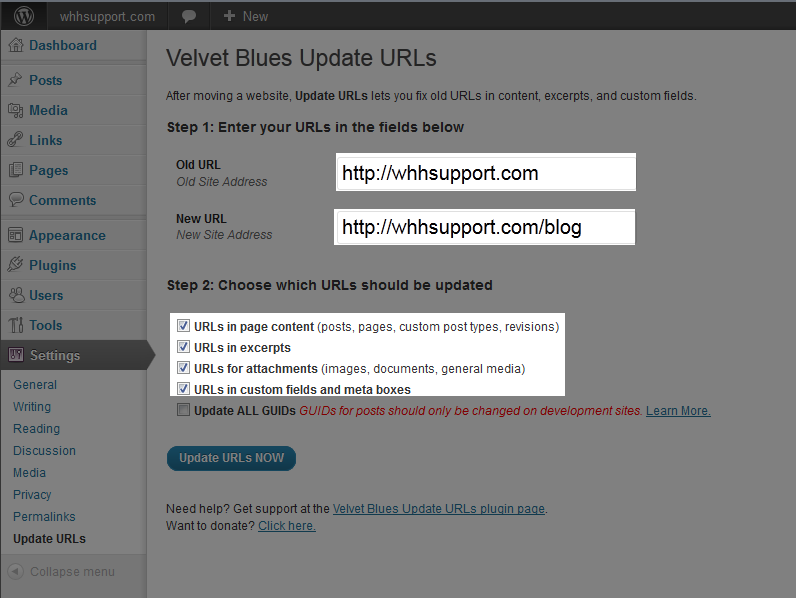
- Enter the previous and current URLs for your WordPress installation. It’s important that the URLs be entered to match the Site URL. For instance, if you included www in your site URL, be sure to include that where appropriate for your Old and New URL.
Old URL: Where WordPress was installed before the move
New URL: Where WordPress is currently installed
-
- Under Step 2 select which types of URLs should be updated. For most users, this should be all except the last option “Update ALL GUIDs.”
-
- Click the Update URLs NOW button to update your site’s URLs
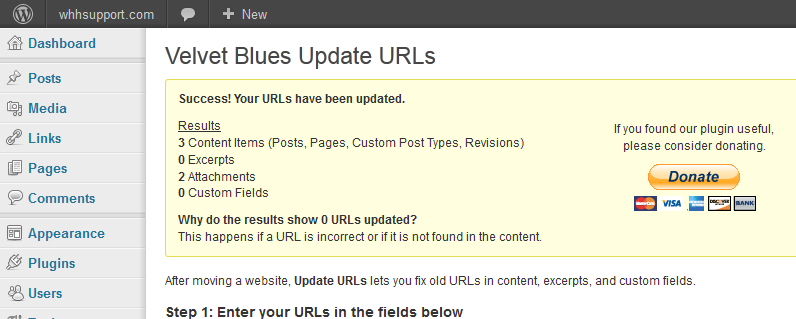
 You should receive a notification that URLs have been updated, similar to this:
-
- Visiting your site should also show that images and links are no longer broken. If necessary, refresh your page or clear your browser cache to view the changes.
Find & Replace Fields – WP Migrate
The Find & Replace fields are available during any push or pull migration, or when running the Find & Replace tool.
During a migration, you are presented with two standard find and replace fields. These are essential in replacing strings that reference the source website with references to the destination website.
The two standard find and replace fields are:
- Site URL: any URLs referencing the old site will be replaced by the new URL during the migration.
- Root file path: any root file paths referencing the old site will be replaced by the new root file path during the migration.

The site URL find and replace field is absolutely essential as it changes the siteurl and home values in the wp_options table. These values must be updated during a migration to the correct value to ensure that your website loads correctly.
The root file path find and replace is mostly for third-party plugins that store the website’s root file path in the database. This find and replace field will ensure that these values are updated to the correct root file path during the migration.
The site URL and root file path text inputs are filled in for you automatically when performing a pull or push migration. If performing an export migration you will need to fill in these inputs manually.
#Retrieving the “New URL” and “New file path” information
WP Migrate DB Pro should be installed and active on both the local and remote WordPress installations.
You can use the following method to retrieve the “New URL” and “New file path” information:
- Log in to the remote site
- Navigate to WP Migrate DB Pro plugin page (Tools → Migrate DB Pro)
- Click the Migrate tab and then click Find & Replace
- Copy the contents of the first field under the “Custom Find & Replace” header (remote URL)
- Switch back to your local site
- Navigate to WP Migrate DB Pro plugin page (Tools → Migrate DB Pro)
- Click the Migrate tab and then click Find & Replace
- Paste the contents of your clipboard into the first empty field under “Replace”
- Switch back to the site you logged into during step 1
- Copy the contents of the second field under the “Custom Find & Replace” header (remote file path)
- Switch back to your local site
- Paste the contents of your clipboard into the second empty field under “Replace”
#Custom Find & Replace Fields
Occasionally you might need to specify a custom find and replace field. When doing a push or pull migration, WP Migrate DB Pro will automatically make an additional Custom Find & Replace field available. You can leave this empty, or add a custom find and replace field. If you need more than one custom replacement, you can click the Add Row button below the existing custom find and replace to create a new one.

A prime example of why you’d want to define additional find and replaces is if you have references to your site’s URL in your database that slightly differ in format from your main site’s URL.
Consider the following:
Your website’s URL is: http://hellfish.media
Your default replace will match your site’s protocol-relative URL. If you have references to your site using a sub-domain, these URLs will not be replaced during a migration using the default find and replace fields.
So in this example, http://www.hellfish.media will not be replaced during a migration.
To have those values replaced during the migration you’ll need to add additional find and replace fields to have those slightly different URLs replaced.
For example:
- Find for
//www.hellfish.mediaand replace with//hellfish.media
#Regular Expression Find and Replace
There are some situations where you need to find and replace data based on a complex set of conditions rather than just a simple string. As an example, let’s say you need to replace a specific shortcode (foo) with a different shortcode (bar) through all the content on a site while retaining the shortcode’s id attribute.
[foo id="1"]
If you run a custom find and replace to replace the term foo, you’d run into a problem where you would affect any data that uses this string (food, foot, etc). You could try using [foo but that might affect any other shortcodes starting with that same string.
This is where a regular expression find and replace comes into play.
Using the same functionality as the PHP preg_replace function, WP Migrate DB Pro allows you to specify a regular expression (regex) string, to find and replace the correct data.
Your regular expression must be a full pattern regex, meaning it must contain all delimiters and modifiers you wish to use. It’s also worth noting that there is only a specific list of modifiers available to the preg_replace function, as detailed in the Regex Pattern Modifers in the PHP manual.
In the above example, your regex would look something like this:
/\[foo id="([0-9]+)"/
The replace string would look like this, where bar is what we want to replace foo with, and $1 is the data from the capturing group in the original regex, in this case, the id value:
[bar id="$1"
In order to run this on your data, either add this as a custom find and replace row during any migration, or use the “Find and Replace” tool on the site where you want to replace the data.
Enable the regex functionality by clicking on the Regular Expression button, next to the find and replace fields.

Then enter the regex in the find field, and your replacement string in the replace field. If your regular expression is invalid, the plugin will display a notification warning, and you will not be able to run the migration/replacement.

Once you fix the regex, the find and replace row will be ready to be run.

You can test your regex using a tool like regex101.com. When you copy the valid regex from this tool, you must exclude any modifiers not listed in the Regex Pattern Modifers. For example, a new regex on regex101.com includes the g modifier, which means “find all matches rather than stopping after the first match.”. The preg_replace function assumes that it should be replaced globally, so adding that modifier results in an error. It should be left out of your regex in the find field, and the plugin will report it as an invalid regex if you leave it in.
#Case-Sensitive Find and Replace
Similar to the regex find and replace, it is also possible to enable a case-sensitive custom find and replace.
The default functionality for custom find and replace is to perform case-insensitive searches. This means that if you enter User in the find field, it would find and replace instances of both User and user. This is not ideal if you only want to replace instances of User!
To enable a case-sensitive custom find and replace, click on the Case Sensitive button next to the find and replace row. Then enter the find and replace strings as normal.


