Menu

Menu

Start a new Project

From the Google Cloud Platform, create a New Project

  1. Name your project using a unique name (note: this cannot be changed later)
  2. Fill out your Organization’s name
  3. Enter the location of your project

Billing Information

We will now need to set up billing information for your project. You may do this from the Left Panel > Billing

Billing Step One

  1. Select a Country that applies to your project
  2. Agree to Terms of Service
  3. Click Continue

Billing Step Two

  1. Select an Account type
  2. Enter a Business Name
  3. Select a Payment method
  4. Enter your Payment information as chosen above (example: credit card)
  5. Click the Start My Free Trial button

Return To Dashboard

Your billing information is now complete for this project.


Creating Credentials

  1. From the APIs and Services > Credentials Tab, click the + Create Credentials link and select API key
  2. You will now get an API key. For your protection, it is best to restrict this key from being used elsewhere

Adding Applications

We can now associate applications to be used with your key. From the APIs and Services dashboard click library

Adding Maps Embed API

  1. In the search box type in Maps. You will need the Maps Embed API for the Elementor Widget. Select this in the list below
  2. Click the Enable Maps JavaScript API Button
  3. This will now show in your list of available APIs and start collecting data

Add Your API Key to Elementor

You may now navigate to Elementor > Settings > Integrations and place the key in order to use the Maps Widget.

Edit with Elementor > add Latitude and Longitude (you can find here: https://www.latlong.net)

You can manually update the themes bought from ThemeForest with either of the method explains as below –

General Method –

  1. Log into FTP Account using FileZilla or similar program.
  2. Go to wp-content/themes directory
  3. Move to the theme directory that you want to update.
  4. Now, download the latest version of theme from ThemeForest.net/downloads
  5. If you have downloaded the zip, extract it. Find the theme folder. It generally has style.css file in it.
  6. Upload all files in that folder to the directory on FTP we found in step #3 above.

User friendly Method –

  1. Download Envato Toolkit plugin from here.
  2. Install the above plugin
  3. This plugin will allow you to update themes you’ve bought from ThemeForest.

In today’s video tutorial we’ll learn how to enable the front-end editor option in WPBakery page builder WordPress plugin in a fast, simple and easy method so you can edit the page directly in the front-end without the needs to re-load the page to see the changes or editions.

In the latest version of WordPress 5.8 comes with some new features and one of them is Widget Block Editor. Widget block editor has based on the Gutenberg editor that you have in post add/edit.

So here, we will see how to disable the widget block editor in WordPress and get back to the classic editor.

Using the use_widgets_block_editor

Just add the following one-line code in your active theme’s functions.php file and save it.

add_filter( 'use_widgets_block_editor', '__return_false' );
Using the rempove_theme_support

The function remove_theme_support(‘widget-block-editor’) will disable the block editor. See the code below.

function disable_wbe_theme_support() {
    remove_theme_support( 'widgets-block-editor' );
}
add_action( 'after_setup_theme', 'disable_wbe_theme_support' );

Using the Plugins

You can also use the plugin to disable the block widget editor and get back your classic widget area.

You need to just install the plugins and activate them and follow the settings if they have one.

The are the two plugins to disable the widget block editor.

Sharing your beautiful Instagram feed on your WordPress website is a great way to boost your follower count and get more engagement. But to do this, you need to create or generate your Instagram access token first. Don’t worry, this is easier than you think. Today, we will show you how you can collect your Instagram access token in only three easy steps.

Instagram Access Token


Why Do You Need To Collect Instagram Access Token?

Sharing photos from third-party accounts is prohibited by Instagram. So, in order to prove that you have permission to share Instagram images on your WordPress website, you need to retrieve your Instagram access token. This token is basically a set of characters that allow other applications access to your Instagram account.

It may sound like too much trouble, but this is actually a very secure way to ensure that your content on Instagram is being protected from people who do not have permission to use your photos.

Once you have the access token, you can simply connect your Instagram account to your WordPress website and share your stunning photos with your site visitors.

How To Create Instagram Access Token Easy Steps?

In this section, we are going to give you a step-by-step walkthrough on how to create your Instagram access token within minutes. You do not need any extra tool to do this; you just have to make sure that your Instagram account is public, and then you have to create an app on Facebook Developers. Here’s how you can do it without breaking a sweat.

Step 1: Add A New App On Facebook For Developer

First, head over to Facebook Developers Account and log in with your own Facebook profile credentials. Afterwards, click on the ‘My App’ button at the top of the page. This will redirect you to a new page where you can click on the ‘Create App’ button to add a new app on Facebook developer.

Instagram Access Token

As soon as you click this button, a popup will appear where you have to choose what you want your app to do. This decides the permissions that your app will need. In this case, you will need to go for the ‘Something Else’ option as shown below.

Instagram Access Token

Afterwards, give a name to your app inside the ‘App Display Name’ input field. Enter your email address and choose a Business Manager if you have one. When you are done, click on the ‘Create App’ button.

Instagram Access Token

That’s it! You have successfully created a new app on Facebook Developers. Wasn’t that easy?

Now, you just have to set up the Instagram Basic Display API. This is the API that allows your app to get access to your profile information, photos and videos from your Instagram account. Move on to the next step to learn how to set up Instagram Basic Display.

Step 2: Configure Instagram Basic Display

As soon as you create your app on Facebook developer, you will be taken to a new page. From here you will see several different options as shown below. Click on the ‘Set Up’ button under Instagram Basic Display.

Instagram Access Token

You will be taken to the ‘Basic Display’ page where you have to scroll down and find the  ‘Create New App’ button. Click on this button and then enter the name of the app you created earlier.

Instagram Access Token

You are done configuring Instagram Basic Display. Now it’s time to go retrieve your Instagram access token.

Step 3: Generate Your Instagram Access Token

To get your Instagram access token, first you add an Instagram Test user. From the  ‘Basic Display’ page, scroll down until you find the ‘Add or Remove Instagram Testers’ button.

Instagram Access Token

Simply add the Instagram user ID of the person you want to set as your tester. If you are planning on sharing your own photos and videos, then just add your own Instagram username to grant access to your account.

Instagram Access Token

Once that’s done, log in to your Instagram account and navigate to Settings→ Apps and Websites and click on the Tester Invites tab as shown below.

Instagram Access Token

Accept the invitation and return to your Facebook Developers dashboard. Click on the app you have created and go to the ‘Basic Display’ page. Afterwards, scroll down to the ‘User Token Generator’ section and click on the ‘Generate Token’button.

Instagram Access Token

A pop-up will appear with your Instagram access token. You can now copy this token to your clipboard and show your Instagram posts on your WordPress website.

Instagram Access Token

Just like that, you can easily collect your Instagram access token to share your Instagram photos and videos on WordPress. All it takes is three simple steps and you are good to go.

How To Generate Instagram Access Token 2021

Instagram deprecated their platform’s API and all Instagram feed sections in JWSThemes themes were impacted by this, as access tokens depend on this system to connect.

Starting in early 2020, the Instagram Access Token Generator was deactivated and Instagram feeds were removed from all themes. Merchants are advised to display an Instagram feed using an app.

How to use Instagram feed with all JWSThemes theme :

The Instagram Access Token Generator was a free tool to connect themes with Instagram accounts.

You can download the latest WordPress theme and follow the guide.

YOU MAY ALSO LIKE: CLEAN, MINIMAL WOOCOMMERCE THEME

Clean, Minimal WooCommerce WordPress Theme

VIEW MORE POPULAR WORDPRESS THEMES

Purchase now and get free installation! For each purchase, customer will get free install service worth $50. Just open a topic with your purchase code & provide us WordPress admin information.

Creative Multipurpose Elementor WordPress Theme Business & Consulting Elementor WordPress Theme

Modern Kitchen WordPress Theme Clean, Minimal WooCommerce WordPress Theme

Aqua - Spa & Beauty WooCommerce WordPress Theme Paradise - Multipurpose Spa & Beauty WordPress Theme

Pain - Charity & Fundraise Non-profit WordPress Theme Preschool - Nurseries Kindergarten WordPress Theme

Zadora - Clean, Minimal WooCommerce WordPress Theme Car Dealer WordPress Theme

LMS Education WordPress Theme Financial - Business and Financial WordPress Theme

Best Responsive WordPress Theme 2020

By default, ThemeForest products include 6 months of free support. If during these 6 months you purchase any another license of the theme to use on another client site your support license is renewed automatically for free. However, if you are only using the theme for a single website then after 6 months (if you didn’t extend your support to 12 months) you will need to renew your support license.

To renew your support license simply visit the product page here. On the right side of the screen you will see a big button to renew your support license like such:

Simply click the button and complete the checkout process to renew your support license. If you have any issues please let us know via the item comments section.

IMPORTANT (save money): If you plan on ever using the theme for another website it’s best to purchase a new license of the theme because you’ll get support renewed for free since every time you buy a new license of the theme your support is auto-renewed for 6 months (no matter how many licenses of the theme you have you only need 1 valid support license at a time, so you could buy 100 licenses of Zahar and only need to have 1 valid support license to receive support for all 100 sites the theme is used on). Plus when you purchase a new license, you will also be able to choose to extend the support to 12 months for a smaller fee of course this is only needed if you plan not to buy another license for at least a year.

Your theme (Blance) contains outdated copies of some WooCommerce template files?

This message appears when the WooCommerce plugin changed any of its core template files.

We recommend to always read the changelog of the theme if the latest update of the theme supports that version of WooCommerce.

If you see that the latest version of the theme doesn’t support your installed WooCommerce version then don’t worry because we are working to release a new theme update that supports and upgrades these WooCommerce changes.

We always provide a changelog entry when template files are updated (and include the WC version).

In case you have a theme version that confirms the latest template upgrades in the changelog, you most likely have overridden these template files in your theme or child theme. Manual overrides you did in the theme have to be manually corrected also, please see: How to update outdated templates


So, you’ve chosen to build a WordPress based website – congratulations on making an awesome decision! WordPress isn’t only easy to use for blogging, it also offer tons of fantastic options for design. Most notably, thousands of awesome free and premium themes you can use to customize the look of your website, with just a few clicks of your mouse. Yay!

In this article, we’re going to show you how easy it can be to install a new WordPress theme you’ve purchased from ThemeForest. We’ll also be highlighting some of the most common errors folks run into when installing a theme for the first time. So, grab a theme and let’s get started!

First you need to choose your perfect domain name. Then, select a good web host. Bluehost offers affordable hosting options with 1- click WordPress installation that many people love. We personally prefer and use Managed WordPress hosting from WP Engine where WordPress is already installed and configured for you (plus they manage your server side settings for you).

Option 1: Install your theme through WordPress

If you’ve purchased your theme at Themeforest, you’ll need to download the theme file before you try and install it. Simply log into your account, go to your downloads and locate your theme. Click on the download button and select the “Installable WordPress file only”. This will download the zip file for your theme.

Common error: Downloading the wrong theme zip file

Make absolutely, positively sure you select the “Installable WordPress file only” option. If you select “All files & documentation” by mistake, you will not be able to install this zip as is. Instead unzip the file and then locate the installable theme file within it. Luckily most developers clearly label their files, so it should be pretty easy to find.

Common error: Zip file won’t download

It’s possible that you have your computer setup to automatically unzip files when you download them. You cannot install a regular folder in WordPress. If this is the case remember to right click and “Compress” your theme before moving onto the next step and installing it.

Log into your WordPress installation and before you do anything else make sure WordPress is up to date. Okay – this might not effect the installation of your WordPress theme but it’s a crucial security step. You always, always, always want to keep WordPress up to date.

Now that you’re sure you’re running the latest version of WordPress, navigate to Appearance > Themes and click the “Add New” button at the top of the window. Then click the “Upload Theme” button.

Click the “Browse…” button and select the zip file you previously downloaded. Click “Install Now” and then wait a minute while WordPress works its magic. Once the theme files have been completely uploaded just click the “Activate” button.

Common error: Stylesheet is missing

If after clicking “Install Now” you see an error that “The package could not be installed. The theme is missing the style.css stylesheet,” then you probably didn’t follow our instructions from step 1. You more than likely downloaded the “All files & Documentation” instead of the the installable theme. Go back and double check that you’ve downloaded the correct file.

Common error: Are you sure you want to do this?

After browsing for your theme and clicking the “Install Now” button, it’s possible your WordPress installation will ask “Are you sure you want to do this?” This could be due to the fact that you are trying to install the wrong zip file (remember – you want the “Installable WordPress file only”) or it’s possible the upload limit on your server isn’t large enough.

If it’s the latter, you’ll need to contact your hosting company to have them increase it, or do it yourself by accessing your PHP.INI file via FTP and increasing the upload_max_filesize value.

Common error: White screen

If you attempt to install your theme, and end up on a white screen of death (you know, the WordPress version of the Windows blue screen of death) you probably need to make a tweak to your server. The most common cause of this error is that your server’s memory limit to PHP is too low. To solve this either:

For a more detailed explanation you can see our own Total theme troubleshooting doc that walks you through the steps. But, if you go with a managed WordPress host you shouldn’t ever run into this problem.

Option 2: Install your theme via FTP/SFTP

If you’d prefer to install your theme via FTP/SFTP you can. It’s still super easy, there are just couple important steps you don’t want to miss.

First, you need to install a FTP (file transfer protocol) solution – we like Transmitor FileZilla (this second one is free – woot!). Once you’ve got it installed, open up your app to connect to your server. You will also need to be logged into your hosting account to gather the following information:

  • Name: Give your server a nickname that you’ll remember (especially if you plan on connecting to multiple sites)
  • Where: Choose a location for your server (favorites just happens to be my default FTP/SFTP folder).
  • Protocol: This will depend on which options your host provides for you to connect to your server. Go to your hosting account and locate your FTP/SFTP settings. This will vary based on your host (WP Engine’s can be found on your installs overview page, GoDaddy’s is in the SSH & SFTP tab for site Settings) so you may have to poke around a bit. Select the option that your host offers.
  • Server: Enter your domain name (the server url address) here.
  • Username & Password: This will either be provide by your host in the FTP/SFTP settings or you’ll have the option to create your own new ones. Copy and paste them over.
  • Port: Be sure you’re set to use the same port as specified by your host – you may not need to change this.

Once you’ve added all your info save your server, then click to open it and browse to your wp-content/themesfolder.

Next you’ll need to download your WordPress theme which we covered in detail up above in the “installing your WordPress theme via WordPress” section. Please make sure you’re downloading the “Installable WordPress file only.”

With FTP/SFTP you’ll need to unzip the that file you just downloaded from Themeforest (it should look like an open folder icon). Then upload the extracted theme file.

Now log into your WordPress installation and navigate to Appearance > Themes and click to activate your theme. See – not too hard, right?

Common error: Wrong theme file/folder

When installing via FTP, it’s very important to be sure you upload only the theme file onto your server. A zipped file won’t work this time! Check that you’ve remembered to unzip your download. And, also double check that you’re uploading the correct theme only folder. You may have accidentally downloaded the theme plus docs and anything else.

Option 3: Install (and update) your theme with the Envato Market Plugin

After installing and activating your theme is super easy if you simply install the Envato Market plugin. The best part is that with this free plugin you’ll have access to all of your Themeforest and Codecanyon purchases right from your WordPress dashboard! This makes it even easier to install new purchases as well as keep them up to date so you always have the latest feature additions, bundled plugin updates and any theme security patches.

To get started first, download the plugin zip file from github, then log into your WordPress installation and navigate to Plugins > Add New.

Click on the “Upload Plugin” button at the top left of the screen, browse for the envato-market zip file and then click “Install Now.” When prompted click the “Activate Plugin” link.

Once the plugin is installed and active, you’ll need to sync it with your Envato account to have access to all of your WordPress theme and plugin purchases right from your dashboard. To do this, click on the “Generate A Personal Token” link on the Envato Market plugin page with your WordPress dashboard. This will take you to the EnvatoAPI page where you can generate an authorization token.

To generate your token simply log into your Envato account (unless you’re logged in already), check the box that you have read and agreed to the terms (but don’t uncheck any of the select options – the Envato Market plugin needs access to this info to work properly) and click the green button for “Create Token.” You should see a green success screen next. Copy your token code and go back to your WordPress dashboard.

Paste the code into the Token field on the Envato Market plugin page then Save Changes. If you see an error that says “You do not have sufficient permissions to delete transients” don’t worry – just click your browser’s back button and try adding your token again.

Once your token is saved you should see all of your purchases. Just click the blue button to install your theme, and that’s it. The Envato Market plugin will also show if there is an update available with a banner notice over the item. All you have to do is click to update – it’s that easy!

Common error: Token won’t validate

If your token will not validate it could be one of two problems. You could be entering the wrong code. For the Envato Market plugin to work you MUST generate a token for the EnvatoAPI. Your purchase invoice number, theme license or any other code from your Themeforest dashboard will not work.

The second possibility is that you’ve un-checked some of the required API permissions when generating your code. If this is the case go back and generate a new code without removing any of the pre-checked permissions.

It’s time to start blogging!

That’s it! We’ve covered three very different but also very easy ways to install your Themeforest WordPress theme, so now you should have your theme installed and ready to go. Of course, you may want to take the time to customize your theme using any Customizer options built-in, page builder plugins that have been included, or even custom CSS, but that’s a whole other blog post.

If you have any questions or if you run into any new errors just leave a comment below. We’ll do our best to help, and if we don’t have an answer certainly another community member will.

Happy blogging!

If you want to add a point of sale dashboard to your store, then the OpenPOS plugin for WordPress and WooCommerce can do just that. In this OpenPOS review, we explore the main features and functionalities of this plugin to show you what it can do.

Whether you want to enter the orders you receive into your ecommerce system through a user-friendly dashboard, or you’d like to serve your in-store customers more efficiently, adding a point of sale interface to your business can deliver many benefits. While in the past implementing a point of sale system might have been difficult and expensive, this OpenPOS review demonstrates that’s certainly not the case anymore.

So if you want to add a point of sale dashboard to your business, this OpenPOS plugin review will help you decide if this is the best tool for your project.

Who Should Choose the OpenPOS Plugin?

If you’re taking orders and selling products in person, then the OpenPOS plugin was built for you. By adding a point of sale dashboard to your business, you’ll be able to easily record transactions, process sales, and generate receipts, all through a fast and reliable interface.

However, even if you aren’t taking orders and selling products in person, then OpenPOS could still be a useful tool. For anyone taking orders by phone, or processing orders in some other way, a point of sale dashboard could enhance your workflow. By installing the OpenPOS plugin on your WordPress and WooCommerce website, you’ll get access to a much improved user interface for recording those orders, managing your stock levels, and carrying out many other important tasks associated with running a store, whether it’s an online business, an offline one, or a combination of the two.

OpenPOS also has features for supporting multiple users, dashboards, and sites. Therefore, if your business spans multiple locations or has more than one staff member, OpenPOS should be a suitable option. OpenPOS was also built to work with a barcode scanner, for efficient recording of product sales.

As mentioned, this is an add-on for the WooCommerce ecommerce toolkit for WordPress. That means you will need to be using these two tools – or be willing to start using them – in order to add a point of sale dashboard to your business with the OpenPOS plugin. However, as the WordPress WooCommerce combination is one of the most popular platforms for creating online shops, you’ll be in good company if you choose this technology for your business.

So know that we know who might want to use this plugin, let’s explore the features you’ll have access to if you choose this tool in the next section of our OpenPOS review.

OpenPOS WordPress Point of Sale Plugin Features

WooCommerce Point of Sale

The main feature of OpenPOS is its ability to add a point of sale dashboard to your WooCommerce-powered ecommerce system. However, in this part of our OpenPOS review, we’ll explore what this means in detail. Hopefully, this information will help you decide if this is the right tool for your ecommerce business.

When the OpenPOS plugin is added to your WooCommerce-powered ecommerce store, you’ll be able to handle customer orders and purchases through a point of sale interface. This could be used to sell products in-store using a computer or tablet to record these transactions.

As every transaction that’s recorded via the functionality of the OpenPOS plugin is instantly synchronized with your WooCommerce system, you’ll always have an up to date record of product inventory, sales data, and more. Thanks to this, you and the other people working on or in your store will always be able to get an accurate stock overview for your inventory. However, as the rest of this OpenPOS review will reveal, this ecommerce plugin has lots more to offer.

Support for Multiple Sales Registers and Store Locations

One of the great features of the OpenPOS plugin for WooCommerce is the support for multiple warehouses and outlet locations. Thanks to this, you could have multiple people recording sales at different locations, with your products stored somewhere else. However, with OpenPOS you’d still have an up to date record of sales and stock levels.

There’s also support for multiple registers at the same location. This is ideal for busy stores with multiple servers. As OpenPOS works across multiple locations, everyone will always be able to quickly see what’s in stock and what isn’t.

Furthermore, each register can have its own cash balance that’s also assigned to the store and the user. This all makes it easy to see how much cash should be in the drawer at any one time. With this point of sale plugin, if there’s a discrepancy, you’ll know who you need to talk to.

Well-Designed POS Interface

Openpos Review The UI

Having access to a powerful point of sale features and useful functionality is all well and good. However, if they’re not wrapped up in an easy-to-use interface, then you might not get the results you want. Thankfully, the OpenPOS point of sale interface is well designed and easy to use.

Payment Options

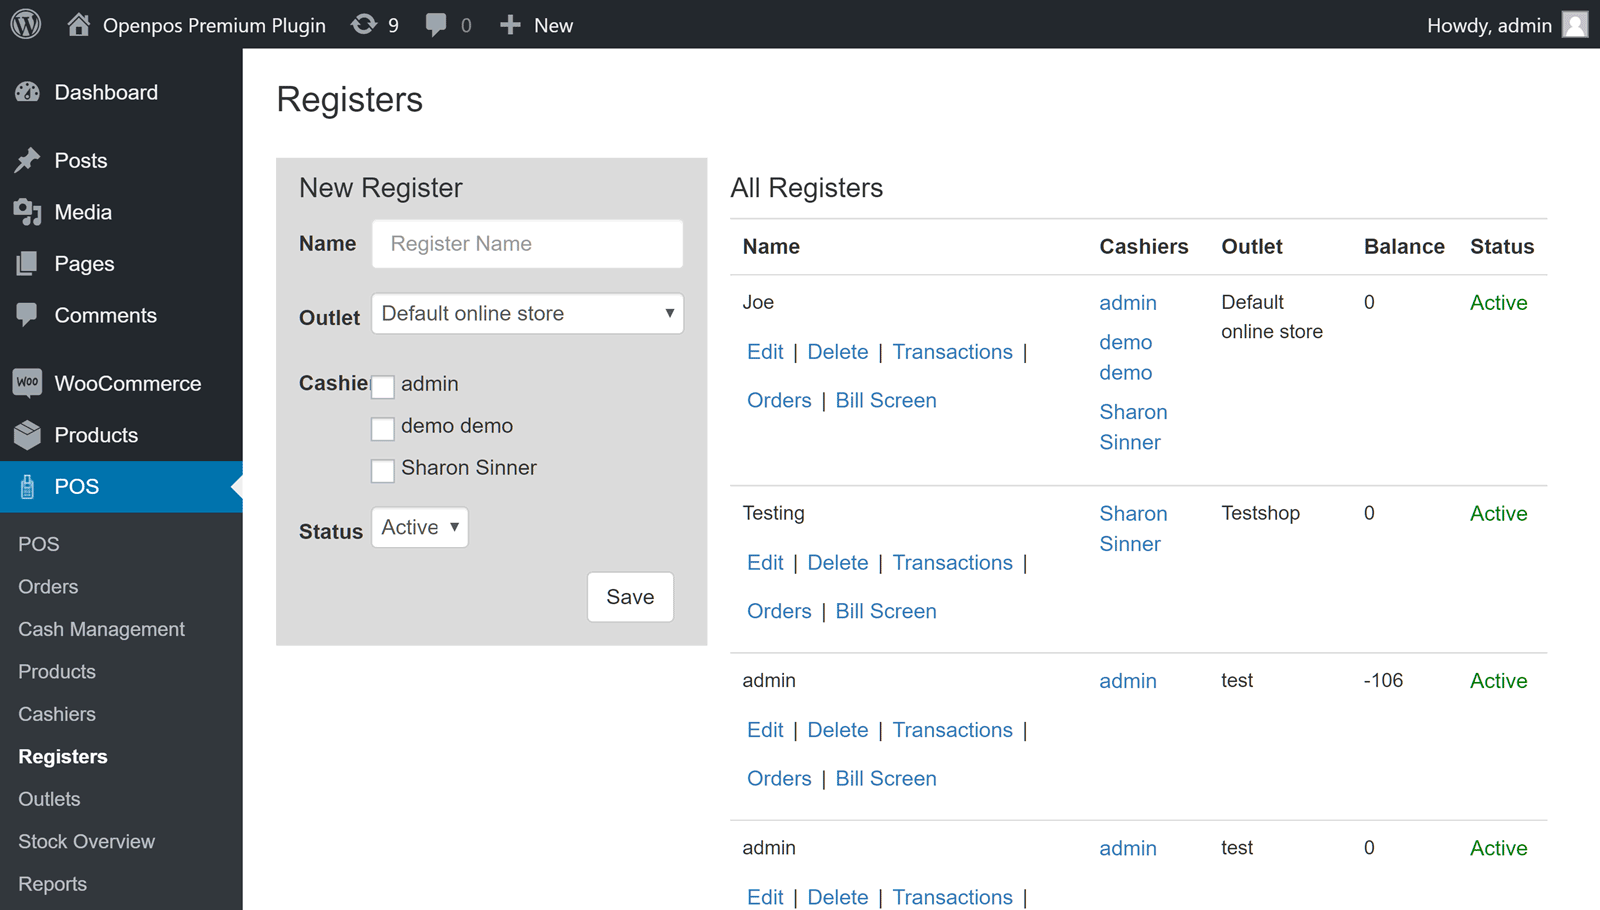
With this plugin, you also have the option of creating multiple point of sale registers. This can be useful if you are selling products or processing orders at multiple locations or on a range of devices and you’d like to create different options for each one. Through the settings, you can control which users can access which registers. You can also view the transitions for a particular register for a more detailed analysis of your business.

POS Registers

Also, if you want to use a tablet to display the order details to your customers, that’s very straightforward. Now as you enter the order details through your device, your customers can view the details of the transaction at the same time.

You can check out the screenshots in this OpenPOS review to see what your dashboard could look like. However, you can also see how the plugin works in these YouTube videos. As you can see, you and your team should have no trouble getting to grips with the OpenPOS user interface, whether using the front or back end of this system.

Point of Sale Offline Functionality

If your internet connection goes down or someone accidentally disconnects, with OpenPOS, there’s no need to worry. When offline, you won’t be forced to turn customers away or find an alternative method of entering transactions. Instead, OpenPOS will continue to work as close to normal as possible when offline. Then, when the connection is restored, all the activity will be uploaded to the system.

Generation of Order Notes and Receipts

Each time a sale is recorded through OpenPOS, you have the option of generating a receipt or order note. Now, keeping a paper copy of each transaction or providing your customers with a receipt for their purchase is easy. You can even set the service to automatically email customers a receipt for safekeeping. Of course, it’s not necessary to generate a physical order note or receipt if you don’t need to. Everything will still be recorded in the system and, if relevant, synched across multiple sites.

Detailed User Tracking

As you can have multiple users accessing the point of sale system, either at the same time or over time, it’s important that you can track who has done what. Thankfully, the OpenPOS plugin has just the functionality required for this. By recording session information like the cashier name, location, and IP address, you should find it easier to manage disputes, query transactions, and monitor how the service is being used by your staff.

Backup Camera Barcode Scanner Solution

As mentioned earlier in this OpenPOS review, you can use this tool with a barcode scanner as part of your point of sale system. However, should a problem arise with your scanner or one not be present, you can use the camera of your tablet or another device as a backup solution.

Quick and Easy Logoffs

Being able to quickly and effortlessly log off and out of the point of sale system is essential. Again, the OpenPOS plugin includes this ability. This makes it easy for you and your team members and staff to protect their account by logging out instantly. This is another useful security-related feature of the OpenPOS plugin that store owners are sure to appreciate.

Credit Card Payment Support

Although you’re free to configure your store to handle payments as you wish, you can also use the built-in support of OpenPOS for taking credit card payment via Stripe. As OpenPOS works on top of the WooCommerce ecommerce platform you have the ability to use any of the many add-ons available, including those that expand your payment processing options. However, with OpenPOS, you do have the ability to take credit card payments via Stripe.

Seamless Integration with WordPress and WooCommerce

Hopefully, you’re aware by now that the OpenPOS plugin was built to work with WordPress and WooCommerce powered online systems. So how does OpenPOS integrate with these two tools?

Well, the good news is that the short answer is very well. OpenPOS can be managed from within your WordPress dashboard, once the plugin has been installed.

User Interface

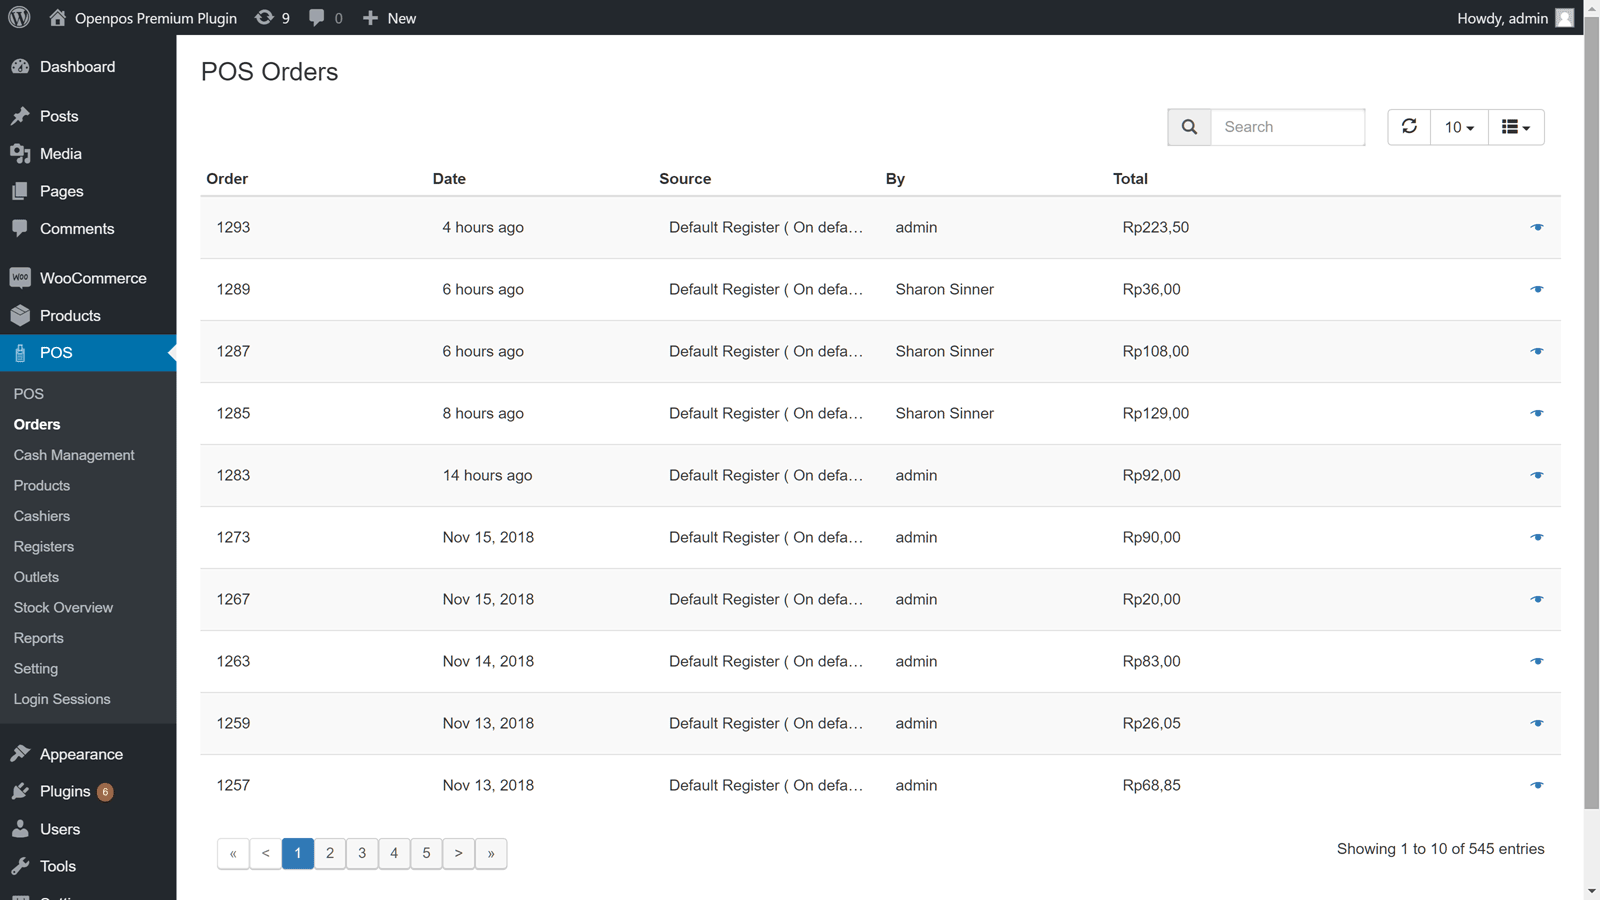
As well as configuring the plugin, you can also view order details and generate reports. All in all, OpenPOS looks and feels like a core part of your website and ecommerce store.

OpenPOS WordPress Plugin User Experience

To give you an idea of what it’s like to use this tool, this section of our OpenPOS review will share some screenshots from the plugin. For more information, you can also log into a demo site that’s been set up to showcase this plugin in action. Details for this can be found on the OpenPOS sales page. But for now, these screenshots will give you an overview of the OpenPOS user experience.

Order Details

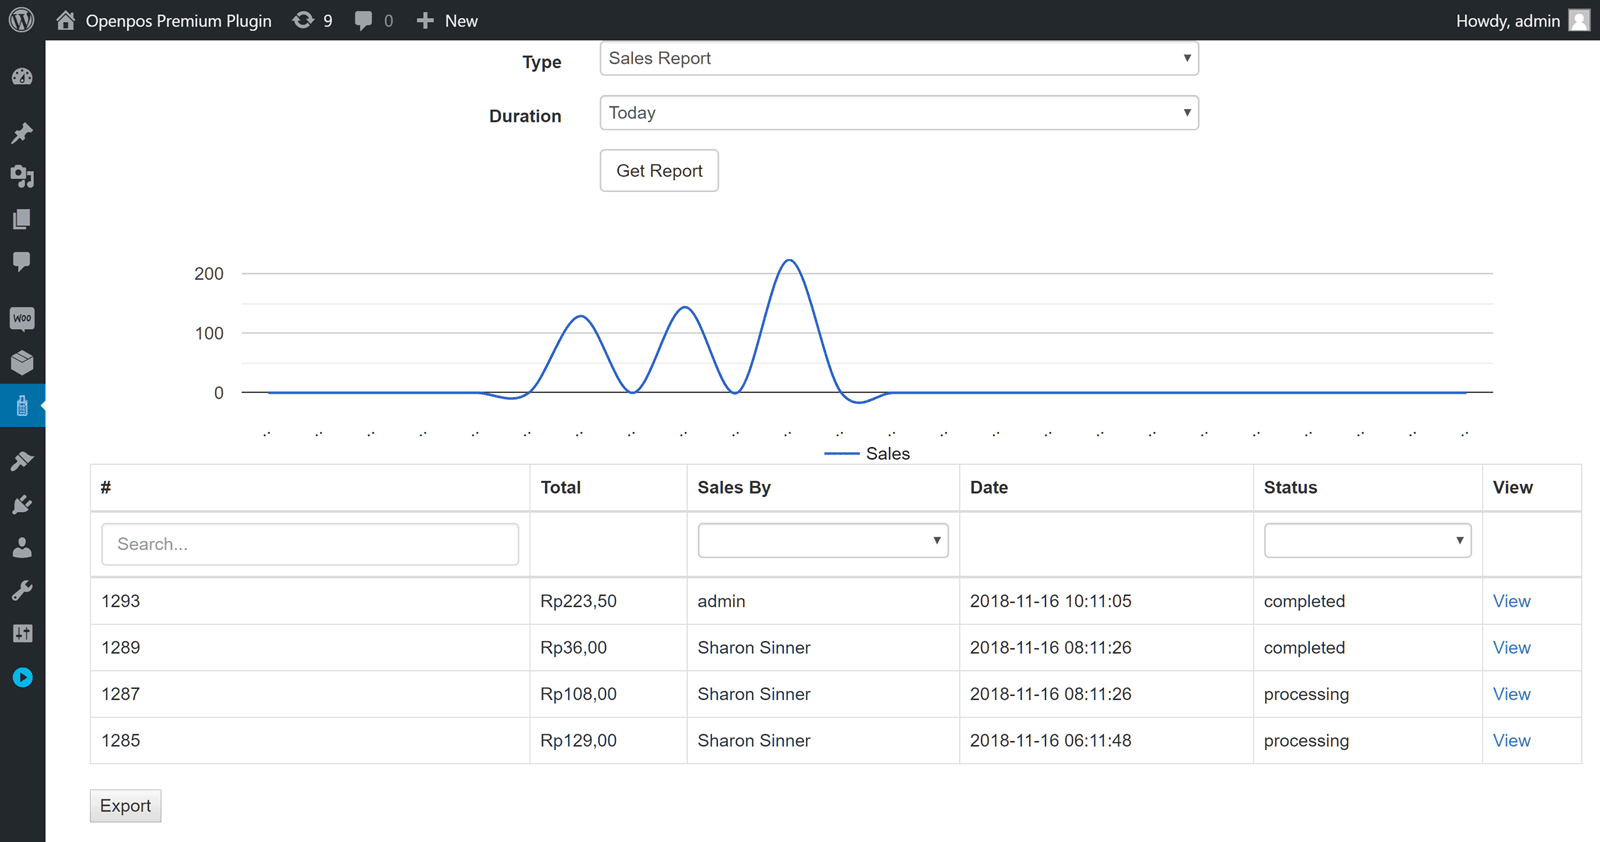
As well as being able to view the order details, you can easily generate reports covering the OpenPOS usage.

Reports

Viewing sessions is straightforward too including seeing where users have logged in from.

Sessions

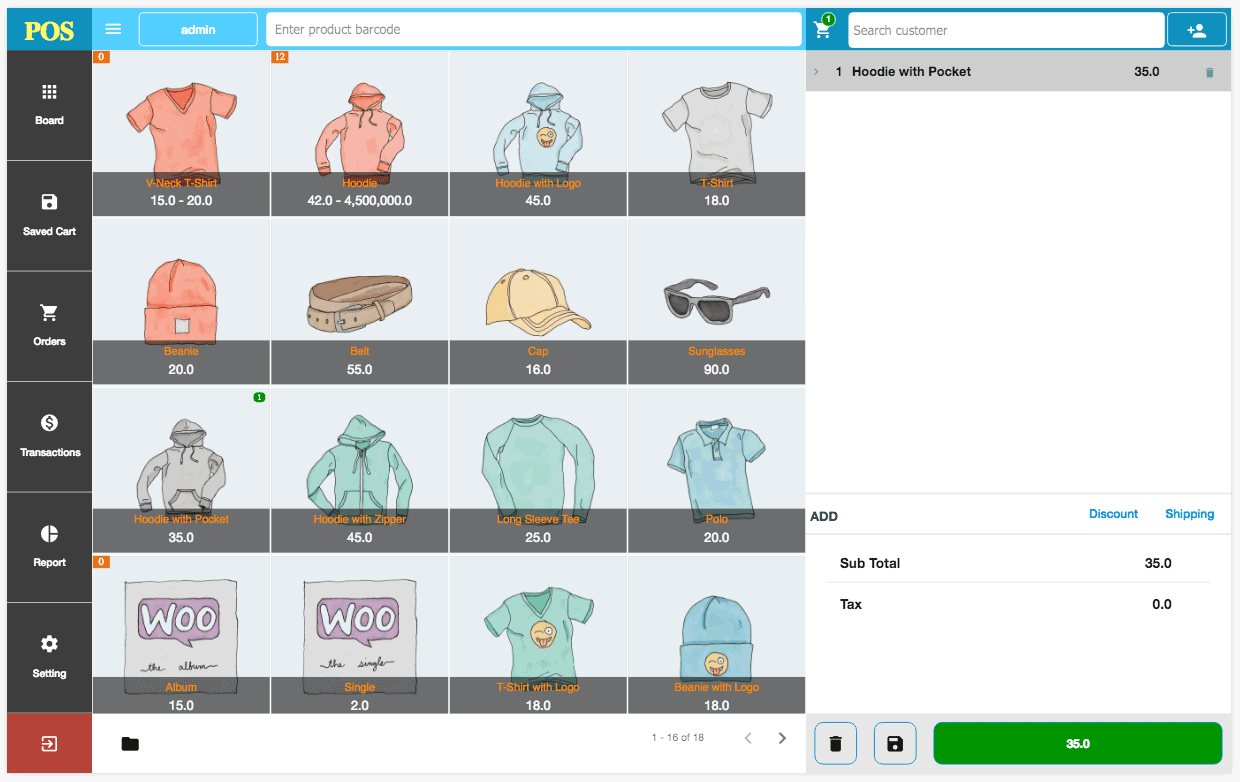
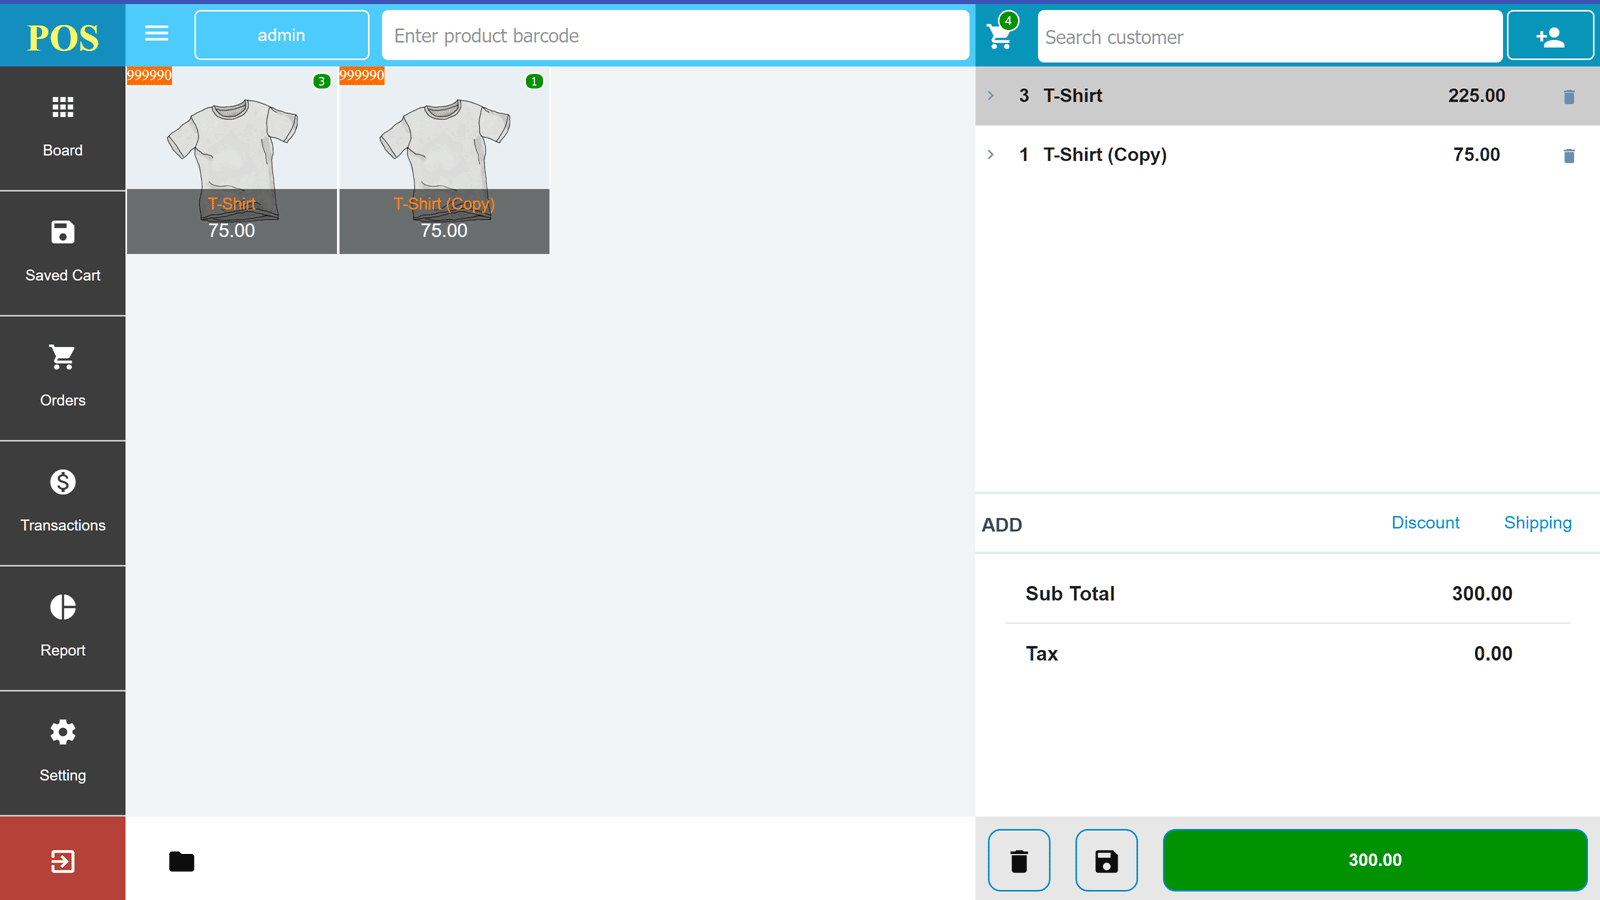
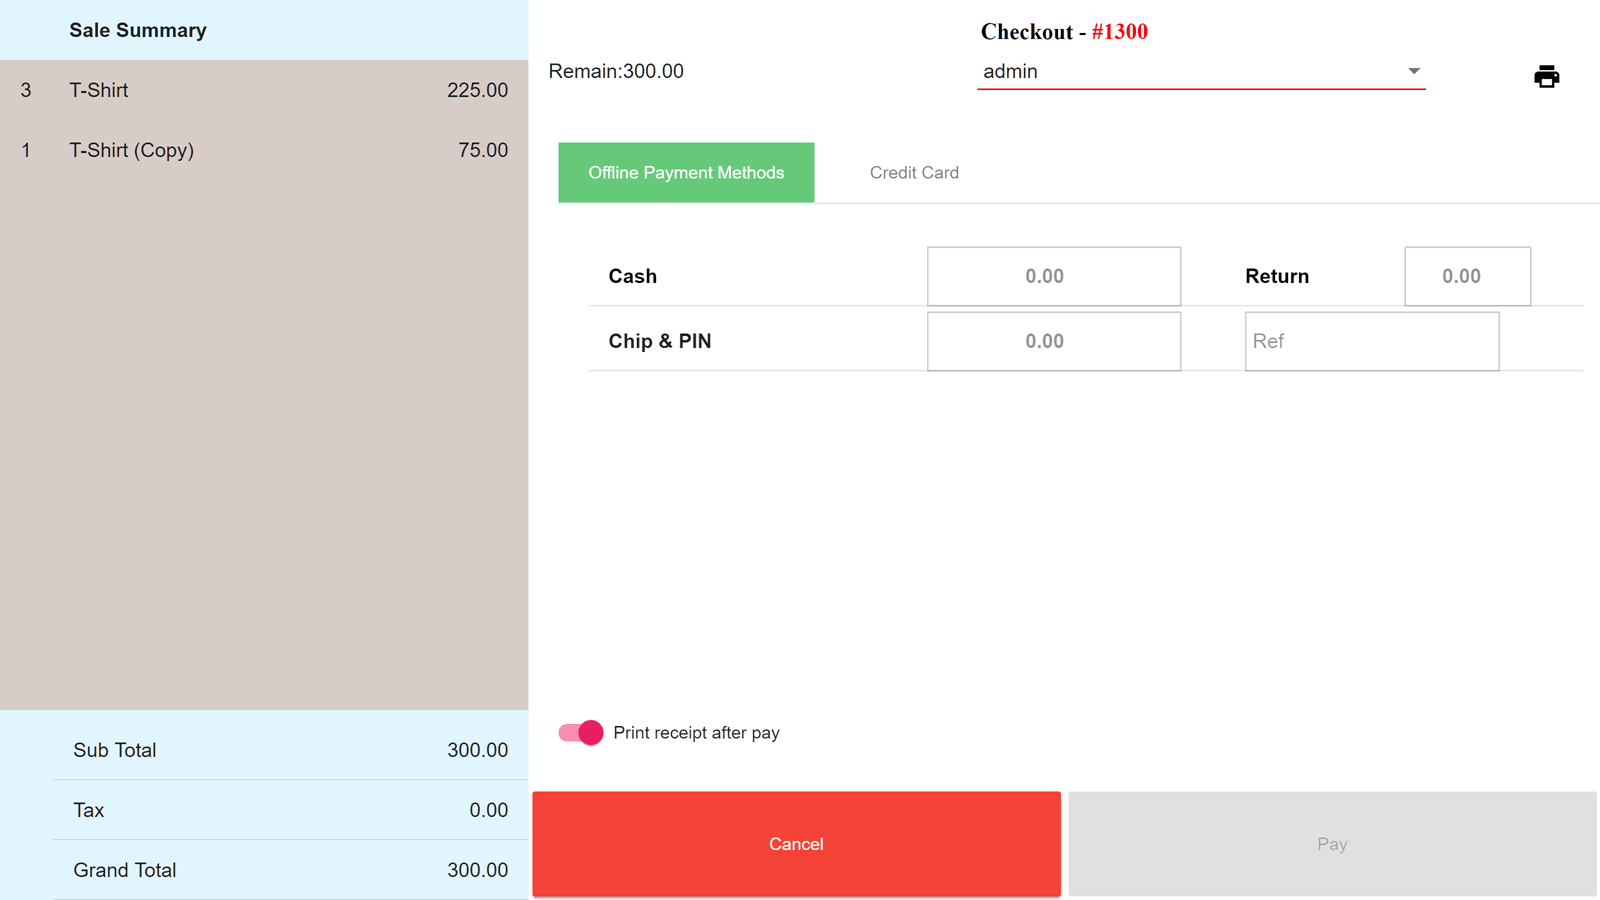
Finally, you’ll be pleased to know that the design of the point of sale interface is well executed.

Openpos Register Interface

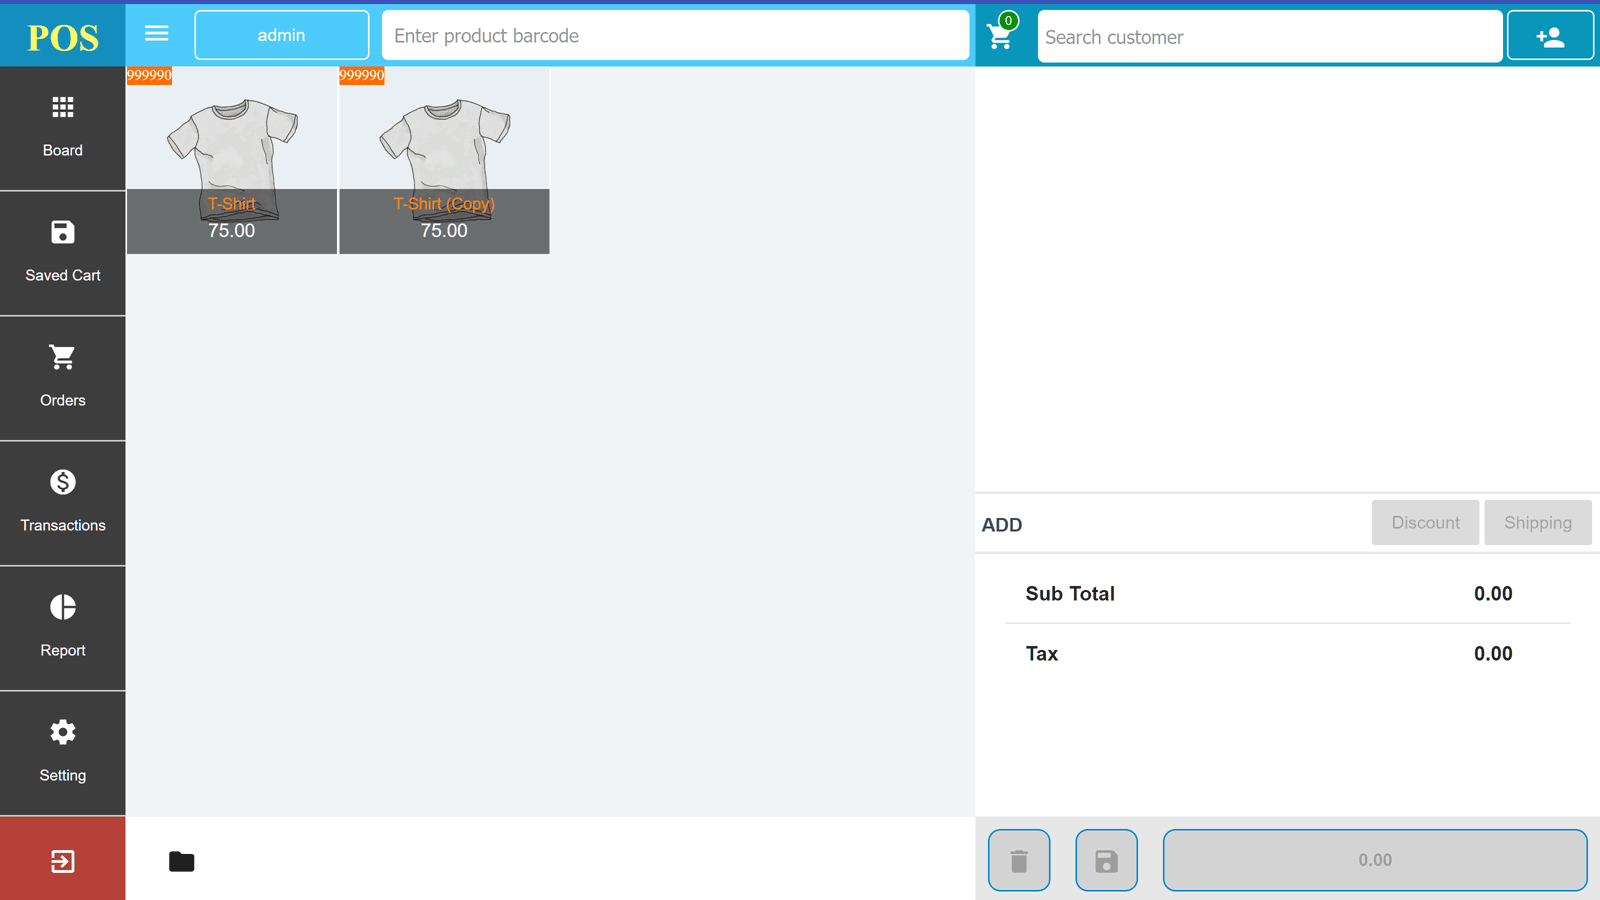
Whether you’re using a touchscreen display with your point of sale dashboard, or a more traditional keyboard and mouse operated device, recording sales through OpenPOS is very straightforward.

OpenPOS WordPress Plugin Pricing Options

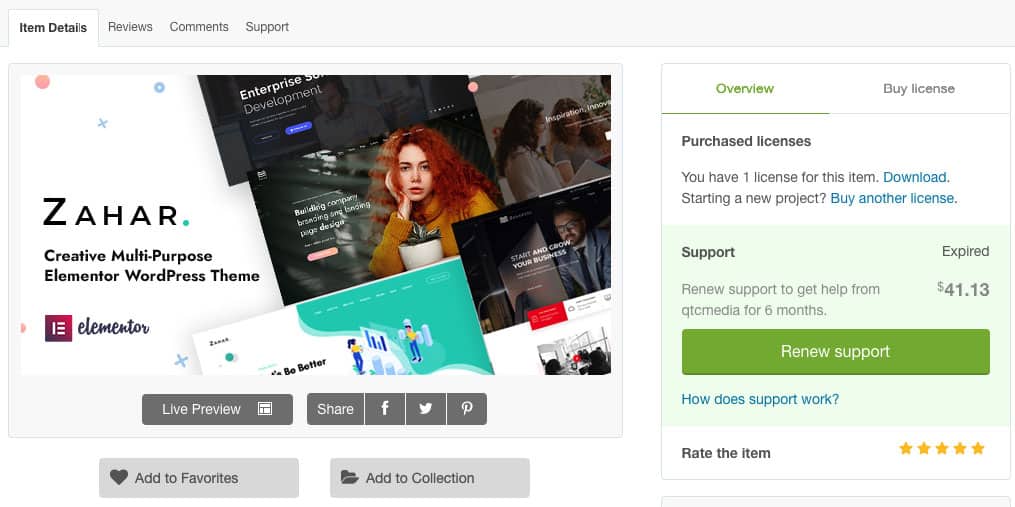
The OpenPOS point of sale add-on for WooCommerce is available for purchase from the Envato CodeCanyon marketplace for $64. This price includes lifetime access to future plugin updates and six months of support from the plugin creator. You can extend the support period to a total of 12 months by paying an extra $22. This is something you might want to consider if you’re running a professional ecommerce store and would like the ability to get assistance should something go wrong with your website.

OpenPOS WordPress Plugin Review Final Thoughts

Hopefully, this OpenPOS review has introduced you to a new ecommerce tool for your store. As you can see, this plugin is more than capable of adding a point of sale dashboard to your business.

Despite the relatively low price, OpenPOS should have everything you need to start taking orders and selling products in this way. Of course, all businesses have different needs. So maybe you might find that there’s a feature you require that’s missing from this plugin. However, for most scenarios, OpenPOS should work well. Furthermore, as this is a relatively newly released plugin, its likely additional features will be added over time. Due to this, be sure to check out the plugin page for the latest set of features.

Both the front and back end interfaces of the plugin are well designed. This ensures that as a store manager you’ll be able to configure this tool. It also means that those serving customers can do so without any problems. The other features of OpenPOS will ensure your inventory is kept up to date. Not only that. You’ll also be able to track all your orders and go back and query any problematic transactions if they arise.

There are a few typos on the OpenPOS plugin sales page, but don’t let that put you off. This well produced and highly functional tool is sure to enhance your ecommerce environment. So if you’re using WooCommerce, or happy to start using this platform, OpenPOS is a great way to add point of sale support to your business.

To find out more and try the OpenPOS system demo, visit the plugin page at CodeCanyon now.

BLANCE – PREMIUM OPENPOS PLUGIN INCLUDED – SAVE $64

Clean, Minimal WooCommerce WordPress Theme