A selection of the best and most advanced science WordPress theme for a variety of purposes.
Science has produced an infinite number of inventions that make human life more comfortable.
And one of them is WordPress!
You can quickly create modern, secure, and user-friendly websites!
We’ve handpicked a theme for you if you want to create a magazine that features news about scientific discoveries or a business laboratory portfolio.
These themes have an easy-to-use interface, great functionality, and a fantastic layout that you can change without coding.
Scroll through the options and select the one that best meets your requirements. From the start, it’s all fun and games!
Datamatix is an Elementor based WordPress theme created to serve all types of data science and related projects. It means that the horizon of applicability of this theme includes data analytics, data science services, big data, business intelligence and many more. The theme comes pre-packaged with a drag and drops page builder (Elementor) to ensure you can easily design your website just how you like it, also The theme includes redux options, which make editing easier. Get Datamatix today and build a remarkable website in no time!
To enhance client connections and increase traffic, the majority of butcher shops open online stores.
The finest platform for building online e-commerce storefronts is WordPress. Here, you may select from a variety of store themes to build a beautiful online store for your company.
We looked at a number of themes and selected the top WordPress butcher Elementor theme for your butcher shop.
They are more responsive, fashionable, and multi-device compatible. Let’s look at it now!
MeatHouse is a meat shop WordPress theme perfectly suitable for meat food, meat farm, meat market & restaurant, meat box, meat delivery and butcher store sites with a flexible design. It supports many great features with its theme options panel.
In addition to having a flexible and easy-to-use design, it has various features such as meatbox building with subscriptions that make it an ideal match for relevant sausages, steaks, raw products, lamb and meat and carne shop websites.
The theme provides professionally designed 5+ homepages, creative headers, and powerful animations. There is no need for coding skills here either. You can drag and drop everything to build the store site you want.
You may exhibit your jewelry business and sell your products online with the help of these WordPress themes for jewelry.
The majority of customers will avoid doing business with a poor website.
Your internet presence must be flawless if you want to gain customers’ trust and boost revenue. Normally, it would be very expensive to attain such a high degree of quality. (Hiring a reputable web development company is not inexpensive.)
BUT! You are not in that situation.
These themes offer numerous useful functions in addition to aesthetic improvements. They can simplify online transactions, make your page responsive to different screen sizes, and improve every aspect of your website’s design.
These WordPess themes make jewelry shine even more!
Auriane is a handcrafted jewelry for WordPress that has lots of pre-built store demos. This theme would work particularly well for stores selling high-end jewelry and other similar items. However, even if your inventory isn’t top tier, you can still use Auriane to give your jewelry store a premium look.
As Auriane has been built around the popular Elementor page builder plugin, opening up the templates of the store demos and editing them through a drag-and-drop interface is very straightforward. This includes the product templates, giving you the option of displaying your items in the way that you want.
This creative WordPress theme utilizes an Elementor page builder which entails that you can simply drag and drop elements to build a website. In just 1-Click, you can try out any demo that you fancy until you come up with the best design that seamlessly resonates with your project. With more than five hundred different options and counting, you will never get tired of mixing and matching design combos.
Let your ideas run free, backed with Zahar, today!
After you’ve migrated your website, most likely you changed the URL of your website as well, these are the steps you need to take:
Go to Elementor > Tools > Replace URL Tab
Enter your old-url and your new-url and click Replace URL
Under the General Tab > Regenerate CSS, click Regenerate Files
In Settings > General on your WordPress Dashboard, make sure that the URLs are similar.
How to Replace URLs in WordPress | Elementor
Better Search Replace: A New Plugin for Updating URLs and Text in WordPress Databases
When migrating a WordPress site to a new domain, you’ll have to update every instance of the site’s URL in the database. Some developers prefer to use tools like WP-CLI or WP Migrate DB to handle this, while others opt for a general database search and replace plugin with a UI in the WordPress admin.
Search and Replace is an old plugin, with nearly a million downloads, that can be used to update URLs and text in the database. I used this plugin successfully for a number of years, but it went without any updates for long time. It has since come under new ownership, although the screenshots demonstrate just how long ago the plugin was released.
Better Search Replace is a new take on database search and replace plugins. It was heavily based on Interconnect/It’s open source Search Replace DB script that performs replacement actions without damaging PHP serialized strings or objects. I’ve used this script a number of times with success, although it’s not as convenient as a plugin. The Better Search Replace plugin packages it up using native WordPress database functions and adds a friendly UI.
The plugin merges the best features from older plugins and the Interconnect/It script to support the following capabilities:
Serialization support for all tables
The ability to select specific tables
The ability to run a “dry run” to see how many fields will be updated
No server requirements aside from a running installation of WordPress
Since searching and replacing in the database is a sensitive action to perform, the “dry run” feature gives you a good idea of what you can expect before pulling the trigger. Even with the option of performing a dry run, you will undoubtedly want to have a backup of your database created before touching it.
Migrations aren’t the only reason for this type of plugin. Perhaps you’ve renamed your company or product line and need to replace all instances throughout your website. This plugin makes it safe and easy to perform the replacements directly within the WordPress admin. I tested it on a development site and found that it is fast and works exactly as advertised.
Better Search Replace was created by Matt Shaw, author of the Revisr plugin that allows developers to synchronize WordPress with a remote Git repository. If you’re a long-time fan of the Interconnect/It script, you’ll find that this plugin is even easier to use. You can find Better Search Replace on WordPress.org.
Using the Velvet Blues Update URLs WordPress Plugin
While updating the Site URL makes it possible for your site to be moved, it doesn’t update internal links or paths to images. The good news is, it is a fairly easy process to update these links.
Begin by logging into your WordPress dashboard.
Do a search for and install this plugin: Velvet Blues Update URLs
Activate the plugin and open the Update URLs settings screen.
Enter the previous and current URLs for your WordPress installation. It’s important that the URLs be entered to match the Site URL. For instance, if you included www in your site URL, be sure to include that where appropriate for your Old and New URL.
Old URL: Where WordPress was installed before the move New URL: Where WordPress is currently installed
Under Step 2 select which types of URLs should be updated. For most users, this should be all except the last option “Update ALL GUIDs.”
Click the Update URLs NOW button to update your site’s URLs
You should receive a notification that URLs have been updated, similar to this:
Visiting your site should also show that images and links are no longer broken. If necessary, refresh your page or clear your browser cache to view the changes.
The Find & Replace fields are available during any push or pull migration, or when running the Find & Replace tool.
During a migration, you are presented with two standard find and replace fields. These are essential in replacing strings that reference the source website with references to the destination website.
The two standard find and replace fields are:
Site URL: any URLs referencing the old site will be replaced by the new URL during the migration.
Root file path: any root file paths referencing the old site will be replaced by the new root file path during the migration.
The site URL find and replace field is absolutely essential as it changes the siteurl and home values in the wp_options table. These values must be updated during a migration to the correct value to ensure that your website loads correctly.
The root file path find and replace is mostly for third-party plugins that store the website’s root file path in the database. This find and replace field will ensure that these values are updated to the correct root file path during the migration.
The site URL and root file path text inputs are filled in for you automatically when performing a pull or push migration. If performing an export migration you will need to fill in these inputs manually.
#Retrieving the “New URL” and “New file path” information
WP Migrate DB Pro should be installed and active on both the local and remote WordPress installations.
You can use the following method to retrieve the “New URL” and “New file path” information:
Log in to the remote site
Navigate to WP Migrate DB Pro plugin page (Tools → Migrate DB Pro)
Click the Migrate tab and then click Find & Replace
Copy the contents of the first field under the “Custom Find & Replace” header (remote URL)
Switch back to your local site
Navigate to WP Migrate DB Pro plugin page (Tools → Migrate DB Pro)
Click the Migrate tab and then click Find & Replace
Paste the contents of your clipboard into the first empty field under “Replace”
Switch back to the site you logged into during step 1
Copy the contents of the second field under the “Custom Find & Replace” header (remote file path)
Switch back to your local site
Paste the contents of your clipboard into the second empty field under “Replace”
Occasionally you might need to specify a custom find and replace field. When doing a push or pull migration, WP Migrate DB Pro will automatically make an additional Custom Find & Replace field available. You can leave this empty, or add a custom find and replace field. If you need more than one custom replacement, you can click the Add Row button below the existing custom find and replace to create a new one.
A prime example of why you’d want to define additional find and replaces is if you have references to your site’s URL in your database that slightly differ in format from your main site’s URL.
Consider the following:
Your website’s URL is: http://hellfish.media
Your default replace will match your site’s protocol-relative URL. If you have references to your site using a sub-domain, these URLs will not be replaced during a migration using the default find and replace fields.
So in this example, http://www.hellfish.media will not be replaced during a migration.
To have those values replaced during the migration you’ll need to add additional find and replace fields to have those slightly different URLs replaced.
For example:
Find for //www.hellfish.media and replace with //hellfish.media
There are some situations where you need to find and replace data based on a complex set of conditions rather than just a simple string. As an example, let’s say you need to replace a specific shortcode (foo) with a different shortcode (bar) through all the content on a site while retaining the shortcode’s id attribute.
[foo id="1"]
If you run a custom find and replace to replace the term foo, you’d run into a problem where you would affect any data that uses this string (food, foot, etc). You could try using [foo but that might affect any other shortcodes starting with that same string.
This is where a regular expression find and replace comes into play.
Using the same functionality as the PHP preg_replace function, WP Migrate DB Pro allows you to specify a regular expression (regex) string, to find and replace the correct data.
Your regular expression must be a full pattern regex, meaning it must contain all delimiters and modifiers you wish to use. It’s also worth noting that there is only a specific list of modifiers available to the preg_replace function, as detailed in the Regex Pattern Modifers in the PHP manual.
In the above example, your regex would look something like this:
/\[foo id="([0-9]+)"/
The replace string would look like this, where bar is what we want to replace foo with, and $1 is the data from the capturing group in the original regex, in this case, the id value:
[bar id="$1"
In order to run this on your data, either add this as a custom find and replace row during any migration, or use the “Find and Replace” tool on the site where you want to replace the data.
Enable the regex functionality by clicking on the Regular Expression button, next to the find and replace fields.
Then enter the regex in the find field, and your replacement string in the replace field. If your regular expression is invalid, the plugin will display a notification warning, and you will not be able to run the migration/replacement.
Once you fix the regex, the find and replace row will be ready to be run.
You can test your regex using a tool like regex101.com. When you copy the valid regex from this tool, you must exclude any modifiers not listed in the Regex Pattern Modifers. For example, a new regex on regex101.com includes the g modifier, which means “find all matches rather than stopping after the first match.”. The preg_replace function assumes that it should be replaced globally, so adding that modifier results in an error. It should be left out of your regex in the find field, and the plugin will report it as an invalid regex if you leave it in.
Similar to the regex find and replace, it is also possible to enable a case-sensitive custom find and replace.
The default functionality for custom find and replace is to perform case-insensitive searches. This means that if you enter User in the find field, it would find and replace instances of both User and user. This is not ideal if you only want to replace instances of User!
To enable a case-sensitive custom find and replace, click on the Case Sensitive button next to the find and replace row. Then enter the find and replace strings as normal.
OchaHouse Store Elementor WordPress theme is the ultimate choice for getting started with a website presenting services and products of a tea shop, cafe, tea online business, healthy drinks, beverage and coffee shop businesses, etc. A bright and bold design of the theme makes it look outstanding.
Due to the theme’s integrated with the Elementor and WooCommere , you can easily adjust the ready-made pages to match the needs of a range of other topic-specific websites, including tea ceremony blogs, tea master agencies, herbal tea presentation companies, tea workshops, and tea events firms.
The theme’s mobile-friendly layout makes all parts of your site’s content flawlessly adjust to different screen sizes. 1-Click package includes a collection of pre-designed pages that you can use for your site’s inner pages.
1-CLICK IMPORT ALL DEMO DATA
All of the beautiful pre-made , homepages, demos, templates and page setups you can see here in the Live Preview, are ready to be yours at the simple click of a button. Purchase your copy today, download the installation package and one-click installer guide you through the rest of the setup.
THEME FEATURES
Responsive – This theme is responsive to give a perfect user experience on all devices.
Redux Framework – A free drag & drop framework that comes with a bunch of built in extensions that will help you develop premium themes fast & easy.
Boxed or full width layout – This can be set globally or even per page!
Built on Twitter Bootstrap – OchaHouse uses Twitter Bootstrap. This means that a range of shortcodes are automatically supported. For ease of use you can use the Elementor, easy Bootstrap Shortcode or any other plugins to easily add visuals to your website.
Built with Less .scss
Shortcode Support.
Footer – Easily adjust the footer column count from 1 to 4 columns.
Font Adjusting – Easily adjust the fonts within the theme with our robust theme customizer.
Header stick – Sticky Header is a godsend for those people who are tired of scrolling up from the bottom of the webpage to select an other menu item. Picko’s main menu with logo will be following when you scroll and always be at the top of the screen. Now the viewers of your site will be thankful for the fast and easy navigation. And of course, this sticky header feature can be easily enabled/disabled in options panel of your theme.
Unlimited Color Options.
Moveable & Unlimited Sidebars – Move the sidebar to the left, the right, or hide it entirely for a full width page or post! (global or page/post specific).
Designed with HTML5 and CSS3.
Customizable Design & Code.
800+ Google Fonts.
All installed Extensions are included.
Cross Browser Support.
Detailed Documentation Included.
Full Support.
+ many more features.
More features coming soon.
CONNECT TO SUPPORT
Availability of the author to answer questions.
Answering technical questions about item’s features.
Assistance with reported bugs and issues.
Help with included 3rd party assets.
If you have any questions about customization of this template, which are not covered in the documentation feel free to ask a question in Support Center . We really care about customer support services and guarantee to response to all support topics within 24 hours on weekday (a bit longer over weekend).
Please, feel free to post technical pre-sale questions directly to our Facebook message.
Don’t worry about problem importing demo data. An installation service will setup your theme for free. Please, open a ticket to support center. We will be glad to assist you.
Are you looking for ways where you can integrate OpenTable into your WordPress/Elementor site? Or want to make online restaurant reservations directly from your landing pages?
Then you have come to the right place. In this blog, we will show you how you can easily embed the OpenTable widget in your WordPress site without using any coding. Let’s get started!
What is an OpenTable widget?
Being the preferred real-time online restaurant reservation app, OpenTable does not require an introduction. However, what deserves your attention and an introduction is the – OpenTable widget.
With this widget, you can directly add restaurants to your list by adding the OpenTable Restaurant ID. Customers can then select from the dropdown menu and make reservations trouble-free.
That’s right! No coding! No hassle for you and your customers!
Having said that, let’s examine the steps for integrating OpenTable widget in WordPress.
Embed OpenTable widget in your WordPress site
After installing the above plugins, create a new page or edit the existing page where you want to integrate the OpenTable widget. Now, simply search for the Open Table in the search widget bar and drag it onto the page.
You can locate this widget anywhere on your site. You can, however, easily reach your audience by keeping this widget on your main page.
This is how your OpenTable will look like on your website’s main page. When someone visits your website, he or she can easily reserve a table by selecting the restaurant, the number of people, date, and time.
Grab your OpenTable Restaurant ID
Once you drag the widget, it’s time to add the OpenTable restaurants in the drop-down menu.
To add, simply search for the restaurant’s OpenTable Restaurant ID here. Note down the restaurant ID or just copy it. Now, expand the Basic section of the widget and find the Restaurants field. Here, paste the restaurant ID and save the settings.
Congratulations, you have successfully added a restaurant to your list.
Customization and Styling Details
The MA OpenTable widget comes with additional customization and styling choices.
Starting with the Basic section which comes under the Content tab, gives you the following options:
Widget Language: It lets you display the OpenTable in more than 5 languages.
Widget Type: You can choose to display the table in either of these forms – wide, tall, button and standard.
Reservation Path: This option gives you two options for opening the Find Table window – Open in Overlay and Open in New Window.
Alignment: Here, you can select the alignment of your table – left, right and center.
You can make your OpenTable more appealing by styling it according to your website’s theme. You can do this under the Style tab which lets you edit the text and background color, typography, adjust the padding, border type, and radius.
Wrapping-Up
That’s it.! Thank you for taking the time to read our guide. Do let us know in the comments if you have any doubts regarding the steps.
5. Navigate to Facebook Login and press the Set up button.
6. Select Web from the displayed platforms.
7. Go to the Settings section and choose Basic.
8. In the appeared menu some of the fields are generated automatically. All you need to do is fill in the rest of them, such as App Domains and Contact Email in particular. Please note these two are obligatory options. Privacy Policy URL and Terms of Service URL are optional, but we recommend you NOT to leave them blank. You will not be able to switch your application to live mode without them being set.
9. Once you’ve filled all the necessary fields, press the Add Platform button to move to the next step.
10. Select the Website from the list.
11. Set the website URL address in the Site URL field and press the Save Changes button.
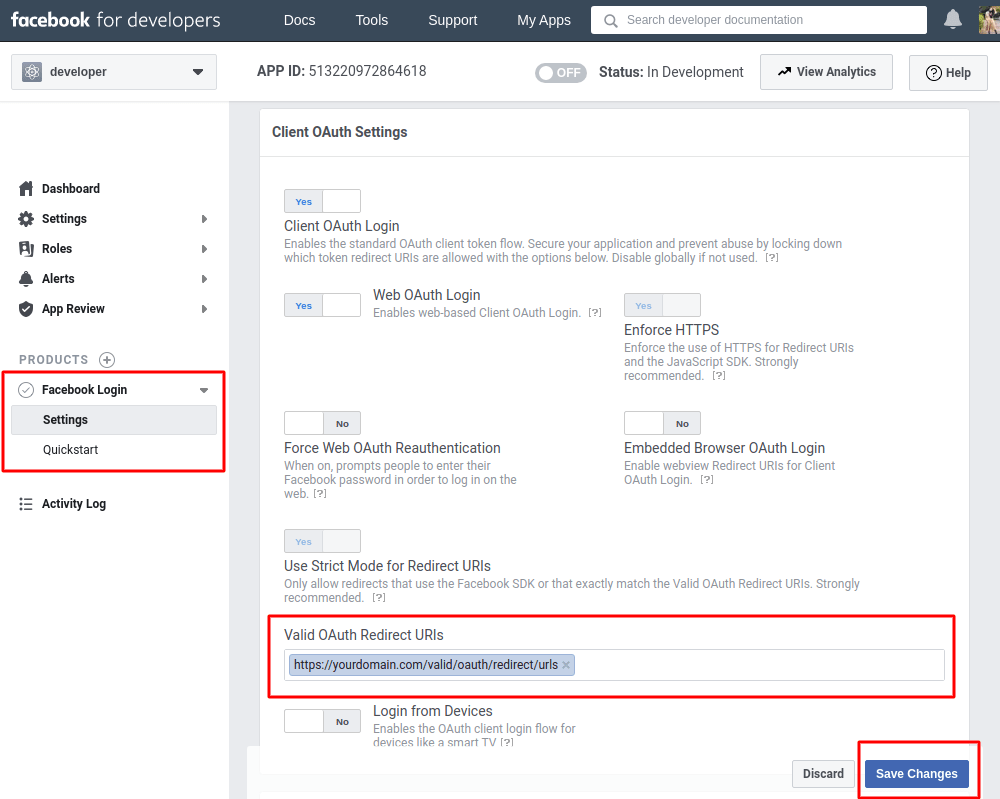
12. Navigate to Facebook Login section and press Settings.
13. Enter you Valid OAuth Redirect URLs. It differs depending on the software you are using it for. Usually, you can get OAuth Redirect URL in the software settings info.
14. Make sure Enforce HTTPS option is enabled due to the Facebook Enforce HTTPS default setting.
15. Press the Save Changes button.
Once you’ve saved all the changes Switch your Facebook APP toLive Mode.
15. Go to Settings > Basic. Here you can find the App ID and App Secret that you will need for software that uses Facebook APP.
Depending on your theme, you may have one or more sidebars available to customize. If a sidebar region does not contain any widgets, it won’t appear on your pages by default. To display a sidebar on your site, simply add widgets to one.
You can customize your sidebar in the WordPress Customizer tool, or on the Widgets page in the dashboard. We’ll review how to do both below:
To create a sidebar with the WordPress Customizer:
1. From your WordPress dashboard, select Appearance > Customizer.
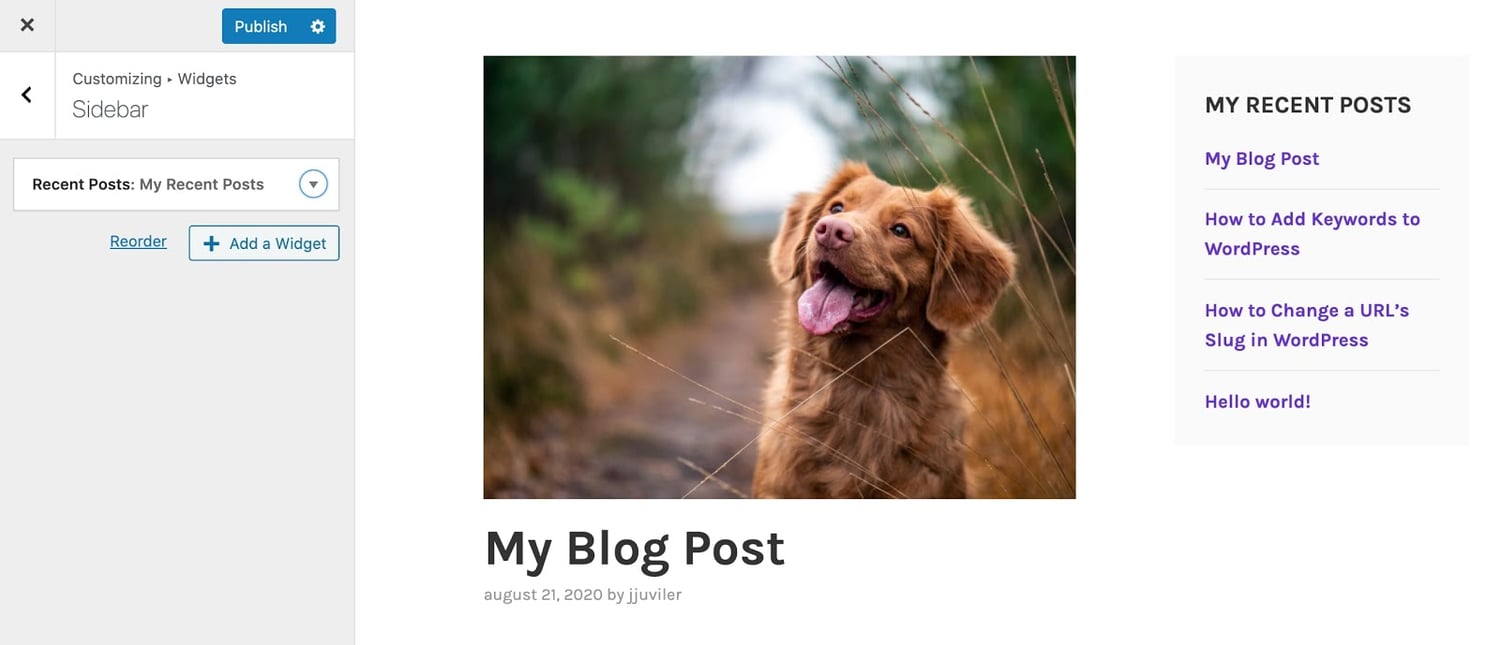
2. In the customizer, choose Widgets, then the sidebar you want to edit.
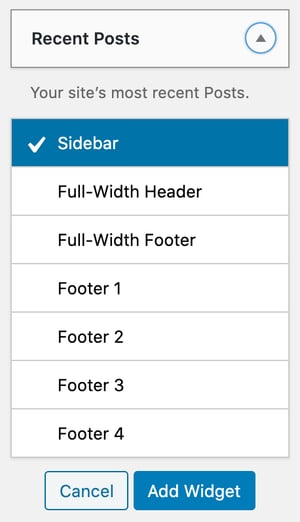
3. Click Add a Widget and choose a widget from the menu. The widget will be added to your active widgets list in the left panel and in your live preview.
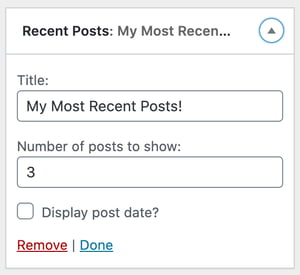
4. Customize your widget settings. When finished, click Done. Click Delete to clear an unwanted widget.
5. Add as many widgets to your sidebar as you like. To change the order of the widgets, click and drag a widget to a new position in the left side panel, or click Reorder and toggle your widget order with the up/down arrow buttons.
6. When finished, click Publish.
To create a sidebar in the Widgets page:
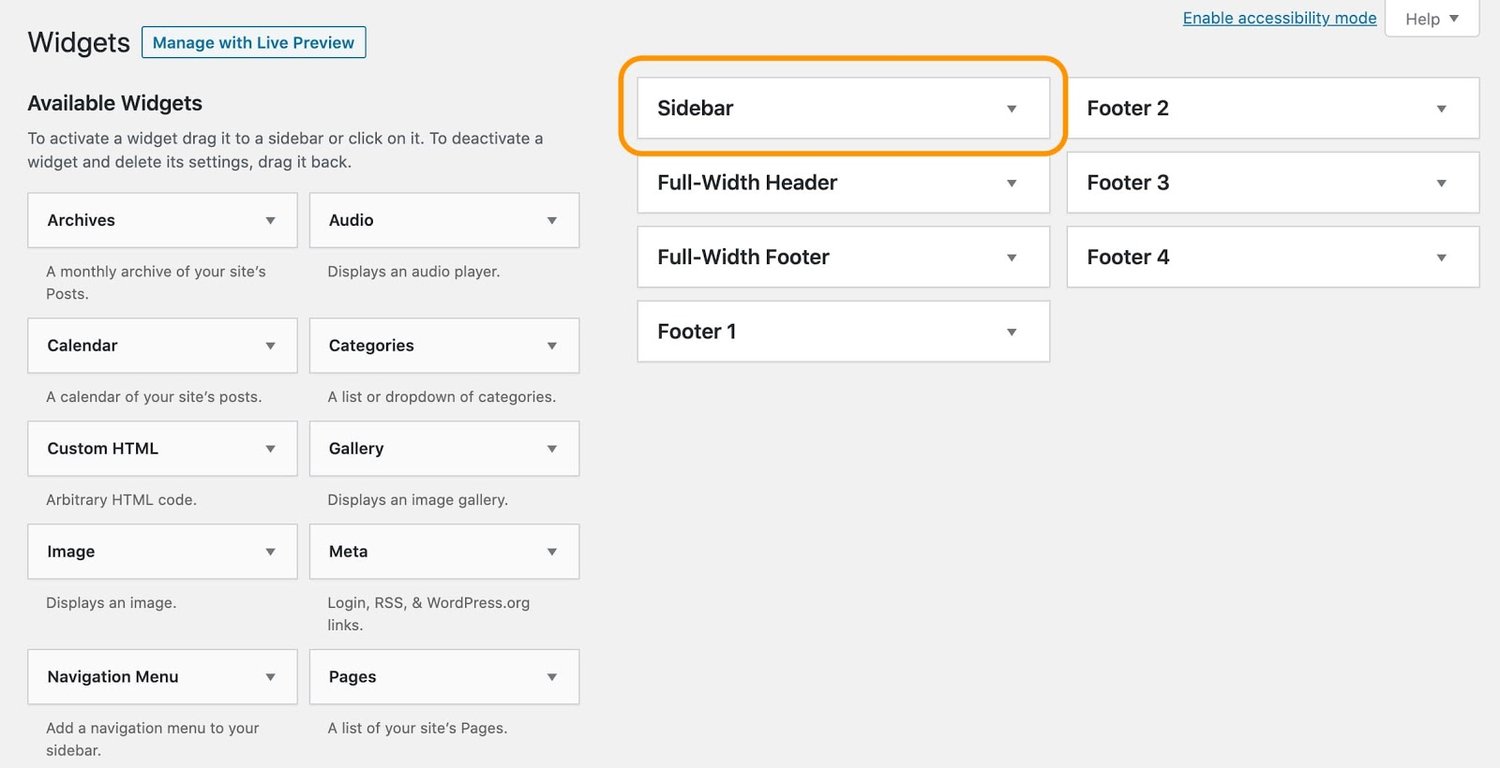
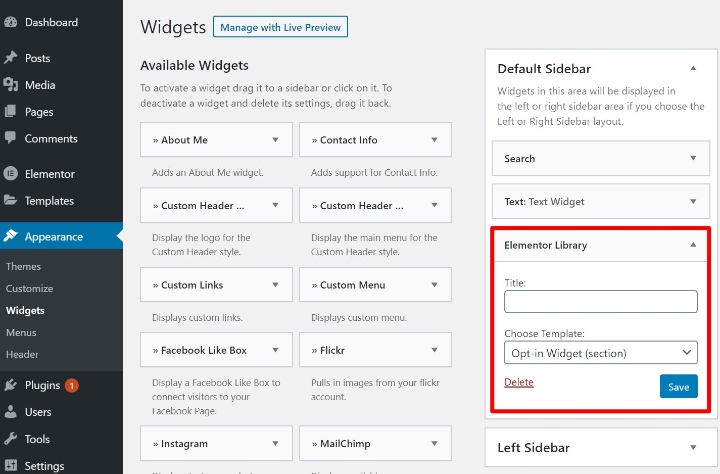
1. From your WordPress dashboard, select Appearance > Widgets. On the Widgets page, you’ll see all available widgets on the left side. If your theme supports sidebars, you’ll see a Sidebar option to the right.
2. Add a widget to your sidebar by clicking and dragging an available widget from into the Sidebar dropdown. Alternatively, click the down arrow icon on your desired widget, then choose a sidebar from the menu and click Add Widget.
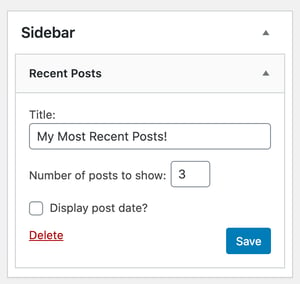
3. Customize your widget settings. When finished, click Done or Save. Click Delete to clear an unwanted widget.
4. Add as many widgets to your sidebars as you like, then preview your changes.
How to Remove a Sidebar in WordPress
Blog sidebars have many benefits, but they’re not perfect for every page or blog design. You may prefer to place your navigation, post recommendations, and CTAs elsewhere.
In this case, removing a sidebar from your WordPress site is straightforward — here’s how to do it in the Customizer and from the dashboard:
To remove a sidebar with the WordPress Customizer:
1. From your WordPress dashboard, select Appearance > Customizer.
2. In the customizer, choose Widgets, then the sidebar you want to remove.
3. Open the first widget listed by clicking the down arrow icon, then choose Remove. The widget will disappear from the sidebar in the preview window.
4. Repeat step 3 for all widgets in your sidebar. Once all widgets have been cleared, the sidebar will disappear from the preview.
To remove a sidebar in the Widgets page:
1. From your WordPress dashboard, select Appearance > Widgets.
2. Open the Sidebar dropdown that you want to remove from your site.
3. Open the first widget in the sidebar and click Delete.
4. Repeat step 3 for all widgets in your sidebar. Once all widgets have been cleared, the sidebar will be removed from your pages.
Enhance Your WordPress Blog With a Sidebar
While sidebars may not work on every blogging website, they’re a mainstay of many blogs today and probably aren’t going away. With WordPress widgets, it’s easy to do testing and on-the-fly reorganization of your sidebars.
So, try experimenting with your sidebar layout and contents to see what keeps users clicking the most. Frequent blog readers will look for a sidebar if they want to find more content or learn more about your brand — make sure you have one that serves them what they need.
Use Elementor to Design Custom Widgets
If you have Elementor Pro, you can use Elementor’s visual, drag-and-drop interface to design content that you include in your sidebar.
To achieve this, go to Templates → Add New and create a new Section template. For example, you could create a template that includes an email opt-in form or a call to action (CTA). Make sure to publish your template when you’re finished.
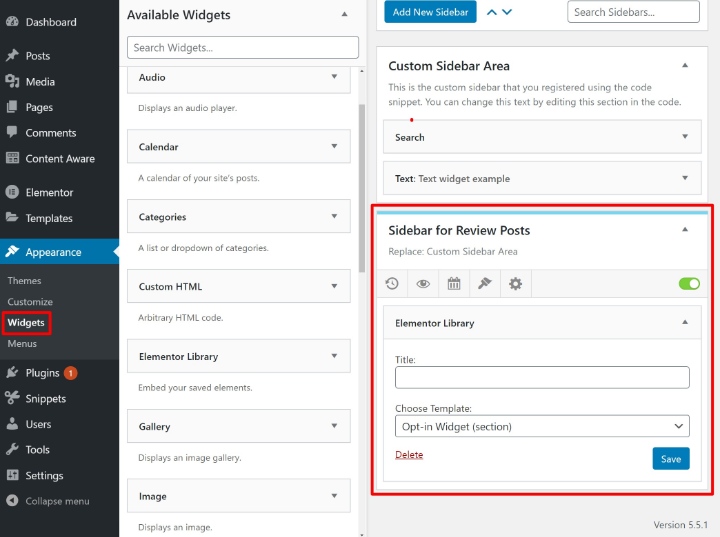
Next, add the Elementor Library widget to your sidebar where you want your template to appear. Then, use the Choose Template drop-down to choose the specific template that you want to add to your sidebar:
How to Add a Custom Sidebar in WordPress
So far, we’ve assumed that your theme already has support for sidebars and gives you built-in settings to control them.
However, what if that’s not the case? Some situations you encounter could be:
Your theme doesn’t have any built-in support for sidebars. This is true of the Hello theme because Hello aims to create the most lightweight foundation possible.
Your theme only includes one sidebar area but you’d like to add another one.
Thankfully, it’s pretty painless to create a sidebar. There are two basic steps here:
You register your custom sidebar with WordPress via a simple code snippet.
You edit your site to display the sidebar on the front-end (via a plugin or code)
1. Register Your Sidebar
Before you can add widgets to your sidebar and display them on the front-end of your WordPress site, you need to register your sidebar(s) with WordPress.
Once you’ve registered your WordPress custom sidebar, it will show up when you go to Appearance → Widgets and you’ll be able to add widgets using the method from the previous section.
To register your custom sidebar, all you need to do is add a small code snippet to either:
The functions.php file of your theme (make sure you use a child theme if doing so).
Using the Code Snippets plugin (or something similar) is the simplest solution because it eliminates the need to use a child theme.
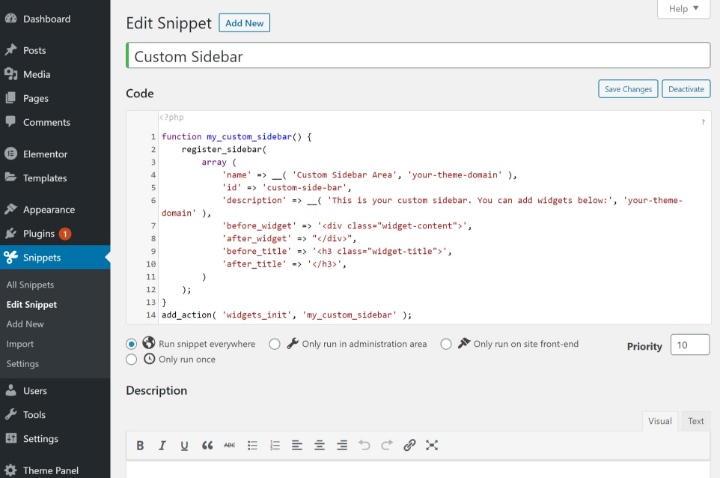
Here’s the code snippet that you need:
function my_custom_sidebar() {
	register_sidebar(
		array (
			'name' => __( 'Custom Sidebar Area', 'your-theme-domain' ),
			'id' => 'custom-side-bar',
			'description' => __( 'This is the custom sidebar that you registered using the code snippet. You can change this text by editing this section in the code.', 'your-theme-domain' ),
			'before_widget' => '<div class="widget-content">',
			'after_widget' => "</div>",
			'before_title' => '<h3 class="widget-title">',
			'after_title' => '</h3>',
		)
	);
}
add_action( 'widgets_init', 'my_custom_sidebar' );
And here’s what that snippet looks like in the free Code Snippets plugin:
2. Display Your Sidebar
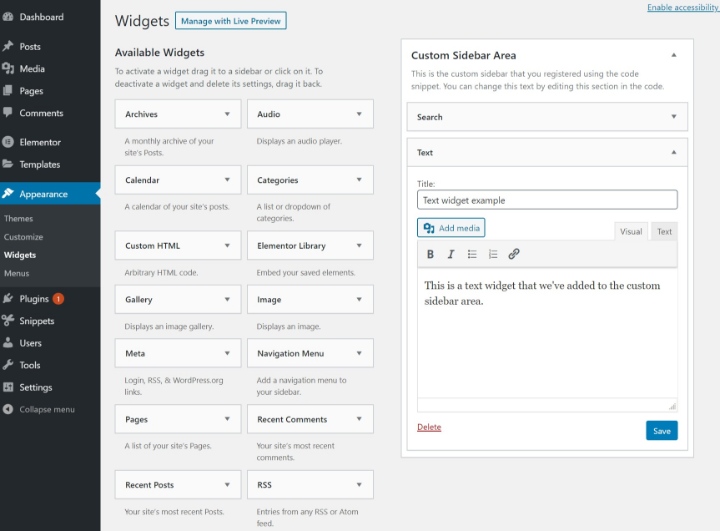
Once you’ve registered your sidebar, you should see it show up as an option when you go to Appearance → Widgets. If you want, you can start adding widgets to your custom sidebar just like we showed you before:
However, you’re not quite finished yet – you still need to configure WordPress so that it displays your custom sidebar (and its widgets) on the front-end of your site.
Here, you have two options:
Elementor’s Theme Builder – you can use a visual, drag-and-drop interface to configure everything and add your sidebar. You don’t need to know any code.
Code – you’ll need at least a basic understanding of PHP, HTML, and CSS.
How to Create a Sidebar With Elementor
With Elementor, you can create new templates for any part of your theme. For example, if you create a new template for your “Pages”, all of your pages will automatically use that template.
You can do the same for your blog posts (or custom post types). You can also conditionally apply your templates to different content, which is useful because it lets you add a sidebar to some pieces of content but not others.
To use Elementor to display your custom sidebar, you’ll basically create a new post or page template that includes your sidebar alongside your main content area.
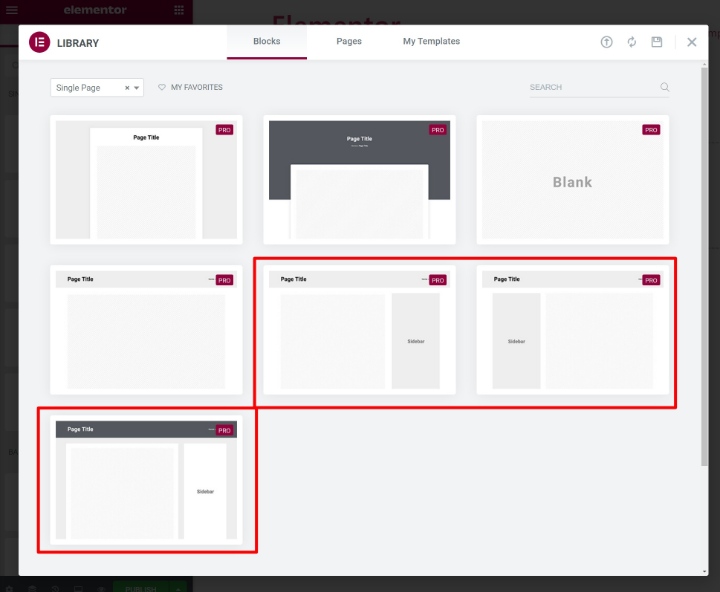
To get started, go to Templates → Theme Builder. Then, choose where you want to add your sidebar first – either Single Post or Single Page:
To save time, you can choose one of the premade templates. Or, you can build your design entirely from scratch. The simplest option is to just choose one of the templates that already includes a sidebar:
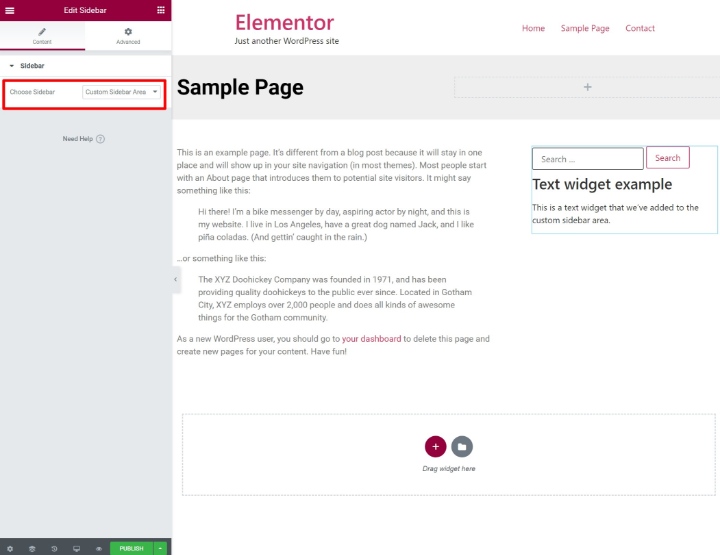
If you opt to design your template from scratch, just make sure to use two columns and add the Sidebar widget where you want your custom sidebar to appear.
Then, edit the Sidebar widget and use the Choose Sidebar drop-down to select the custom sidebar that you registered in the previous step.
Once you do that, you should see a live preview of any widgets that you’ve already added:
As you add new widgets via the WordPress Customizer or the dedicated widgets area, they will automatically appear in this sidebar area.
To finish things out, make sure to Publish your template. When you do, you can use display conditions to control where your sidebar template appears. You can either display it on all content (to use your sidebar sitewide). Or, you can use the display rules to only add your sidebar to specific content.
How to Add Your Sidebar With Code
Unless you feel comfortable working with HTML/CSS/PHP, you should stick with the Elementor method above.
To display a WordPress custom sidebar with code, you’ll need to directly edit your theme’s template files. Because you’re making direct edits to your theme, it’s essential that you use a WordPress child theme. This will prevent your changes from being overwritten when you update your theme.
To learn more about child themes and how to create them, you can read the comprehensive guide to WordPress child themes.
Once you’ve created your child theme, copy the single.php file from your parent theme’s folder to your child theme’s folder. Then, edit the single.php file and add the following snippet where you want your custom sidebar to appear:
To make sure the sidebar appears in its own column, you’ll likely also need to add some custom CSS. This is why the Elementor method from above makes a better option if you’re not a developer.
Depending on how you want to set things up, you might also need to add this snippet to additional template files (like archive.php, etc.)
Now, let’s go the other direction and talk about how to remove a sidebar that you don’t want to use. For example, maybe your theme comes with its own sidebar, but you’d rather use a full-width template for some or all of your content.
To remove a WordPress sidebar, you have the same two options as creating a custom WordPress sidebar:
Elementor Pro
Code
However, before you turn to these options, make sure that your theme doesn’t include a built-in feature to let you disable the sidebar. Many themes give you an option in the WordPress Customizer where you can disable the sidebar without any manual action on your part. Or, your theme might already come with a full-width template, which you can select when working in the WordPress editor.
If your theme doesn’t include this option, here’s how to manually remove your sidebar.
How to Remove a Sidebar With Elementor
To remove your WordPress sidebar with Elementor, all you need to do is create a template that doesn’t include a sidebar area. Then:
If you want to completely remove your sidebar from all content, you can use this template sitewide.
If you only want to remove your sidebar from certain content, you can conditionally display your sidebar-less template wherever it’s needed.
To get started, go to Templates → Theme Builder and choose where you want to remove your sidebar first – either Single Post or Single Page:
To save time, you can choose one of the premade templates that don’t have a sidebar. Or, you can also build your design from scratch – just don’t add the Sidebar widget!
Once you’re finished, you can Publish your template and use the display conditions to control where it appears.
How to Remove Your Sidebar With Code
You can also remove a WordPress sidebar by directly editing your theme’s template files and removing the PHP snippet that displays the sidebar.
Because you’ll be editing your theme’s files, make sure to use a child theme. Then, copy over the template files for the content where you want to remove the sidebar. For example, single.php, archive.php, etc.
Edit those files and remove all instances of <?php get_sidebar(); ?> (or similar variations – the code might look slightly different).
You might also need to adjust the HTML and CSS to make sure everything looks right.
If you’re not familiar with PHP, HTML, and CSS, we recommend sticking with the Elementor method because it eliminates the need to use code.
How to Display Different Sidebars on Different Content
In an earlier section, we talked about how to add a sidebar in WordPress even if your theme doesn’t support it.
However, what if you want to take your existing sidebar area, but just display different sidebars on different content? This would let you display different collections of widgets for certain types of content.
For example, maybe you want to use one set of widgets for blog posts in your “Reviews” category and a different set of widgets for blog posts in your “Tutorials” category.
The easiest way to display different sidebars on different content is Elementor. You do this as follows:
First, create several Elementor templates, as explained above. Each template should have its own sidebar.
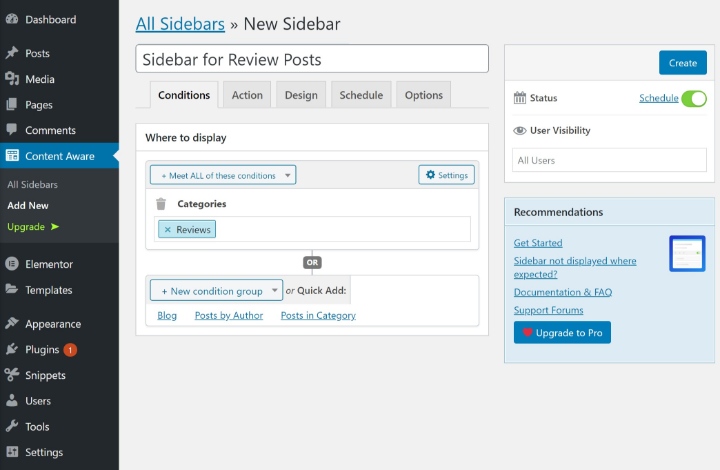
Additionally, to achieve this functionality, you can use the free Content Aware Sidebars plugin. Once you install and activate the plugin, go to Content Aware → Add New to get started.
First, choose the conditions for when you want to replace your default sidebar with the new sidebar that you’re creating. For example, if you want to use this sidebar for all blog posts in the “Reviews” category, create a Categories condition:
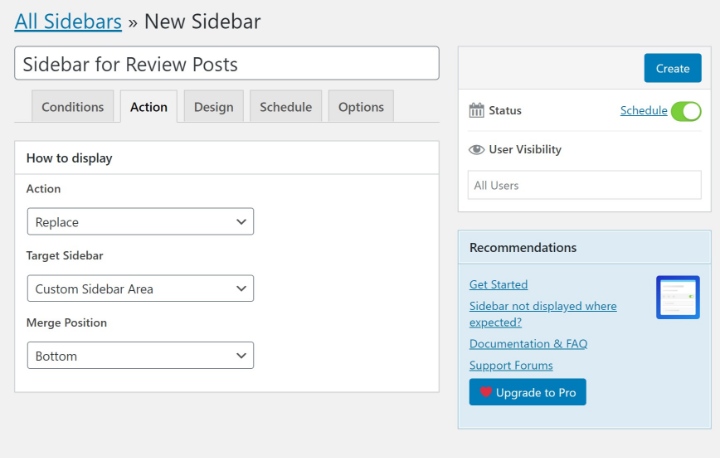
Next, go to the Action tab and choose which sidebar you want to replace. Or, you can also “merge” sidebars to include content from both:
You can peruse the other tabs for some additional settings, but there’s nothing else you need to configure.
Once you’ve made your choices, click Create. Then, go to Appearance → Widgets to add content to your conditional sidebar:
8 Best WordPress Sidebar Plugins to Enhance Your Sidebar
To finish things out, let’s go over some of the best WordPress sidebar plugins that can enhance how you work with sidebars and what content you can include.
Some of these plugins add useful new widgets that you can include in your sidebars, while others adjust the sidebar itself. You’ll also see a few familiar faces from the tutorial sections above.
Auriane is a handcrafted jewelry for WordPress that has lots of pre-built store demos. This theme would work particularly well for stores selling high-end jewelry and other similar items. However, even if your inventory isn’t top tier, you can still use Auriane to give your jewelry store a premium look.
As Auriane has been built around the popular Elementor page builder plugin, opening up the templates of the store demos and editing them through a drag-and-drop interface is very straightforward. This includes the product templates, giving you the option of displaying your items in the way that you want.
THEME FEATURES
Responsive – This theme is responsive to give a perfect user experience on all devices.
Redux Framework – A free drag & drop framework that comes with a bunch of built in extensions that will help you develop premium themes fast & easy.
Boxed or full width layout – This can be set globally or even per page!
Built on Twitter Bootstrap – Auriane uses Twitter Bootstrap. This means that a range of shortcodes are automatically supported. For ease of use you can use the Elementor, easy Bootstrap Shortcode or any other plugins to easily add visuals to your website.
Built with Less .scss
Shortcode Support.
Footer – Easily adjust the footer column count from 1 to 4 columns.
Font Adjusting – Easily adjust the fonts within the theme with our robust theme customizer.
Header stick – Sticky Header is a godsend for those people who are tired of scrolling up from the bottom of the webpage to select an other menu item. Picko’s main menu with logo will be following when you scroll and always be at the top of the screen. Now the viewers of your site will be thankful for the fast and easy navigation. And of course, this sticky header feature can be easily enabled/disabled in options panel of your theme.
Unlimited Color Options.
Moveable & Unlimited Sidebars – Move the sidebar to the left, the right, or hide it entirely for a full width page or post! (global or page/post specific).